Getting started with Airnoise.io
There are multiple ways to file a complaint, and they all give the same result:
- Click the Airnoise button
- Tap one of the buttons on your Airnoise Dashboard page
- Send an SMS text message to Airnoise
When you click your Airnoise button or one of the buttons on the Dashboard page, or when you send a text message to Airnoise, the system will instantly start searching for aircraft near the address in your account. All complaints are assumed to be occurring at that address, so if you're out and about and hear a loud aircraft, sending a text message is going to trigger a search for aircraft over your house, not where you are at that moment.
Airnoise Button Complaints
If you click your Airnoise button once, quickly, the system will typically look for commercial aircraft and business jets near you. If you double-click it, Airnoise will look for small general aviation aircraft and helicopters. Pressing the button for 2-3 seconds and releasing it will simply generate a test email from Airnoise letting you know your button is working.
Dashboard Complaints
The Dashboard page has a series of "buttons" that allow you to tell the system to look for a specific type of aircraft. If you see or hear a noisy helicopter over your home you can click the "Heli" button to only look for helicopters. If you near a loud commercial jet, you can hit the "Airline" button to look for jetliners.
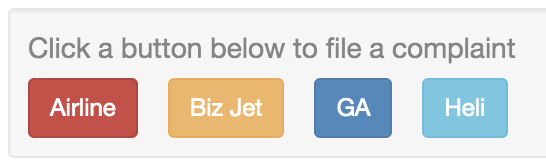
If you tell the system to look for one type of aircraft, say, a commercial jet, and it only finds a large business jet, it won't create a complaint for the airplane it finds. This allows you to target your complaints against the actual type of aircraft overhead, but that assumes you know or can tell what it is. What if you can't?
Any Aircraft Search
We realize it's a challenge to know what's flying overhead, especially at night or when you simply can't see the airplane. To solve that, we've added the "Any Aircaft Search" button. It's the first button you'll see on the Dashboard and has a little airplane icon.
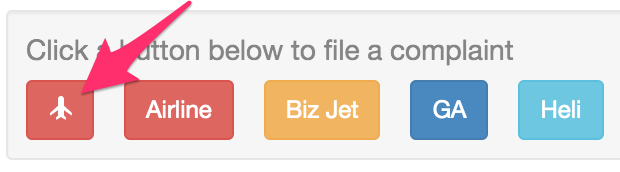
When you click this button the system will look for any aircraft near you, and it will file a complaint on the closest one it finds. You don't have to know what's up there making noise -- just click this button and the system will sort it out. If it still can't identify an aircraft you'll see "Any Aircraft" listed in the complaint that it tried to create but no other details. This tells you that, despite our best efforts, we weren't able to identify what was overhead at the time.
If you have an Airnoise button and "Any Aircraft Search" is enabled, you can trigger it with a single-click of your button.
This is a new feature that we are rolling out slowly, so if you don't see it in your Airnoise account, don't worry, you will soon.
Text (SMS) Message Complaints
With a paid account you can register one or more mobile phone numbers from which to generate Airnoise complaints. When you register your phone the system will send you simple instructions on how to trigger noise complaints with very short text messages. If "Any Aircraft Search" is enabled you can text "any" or just an "x" to trigger that search.
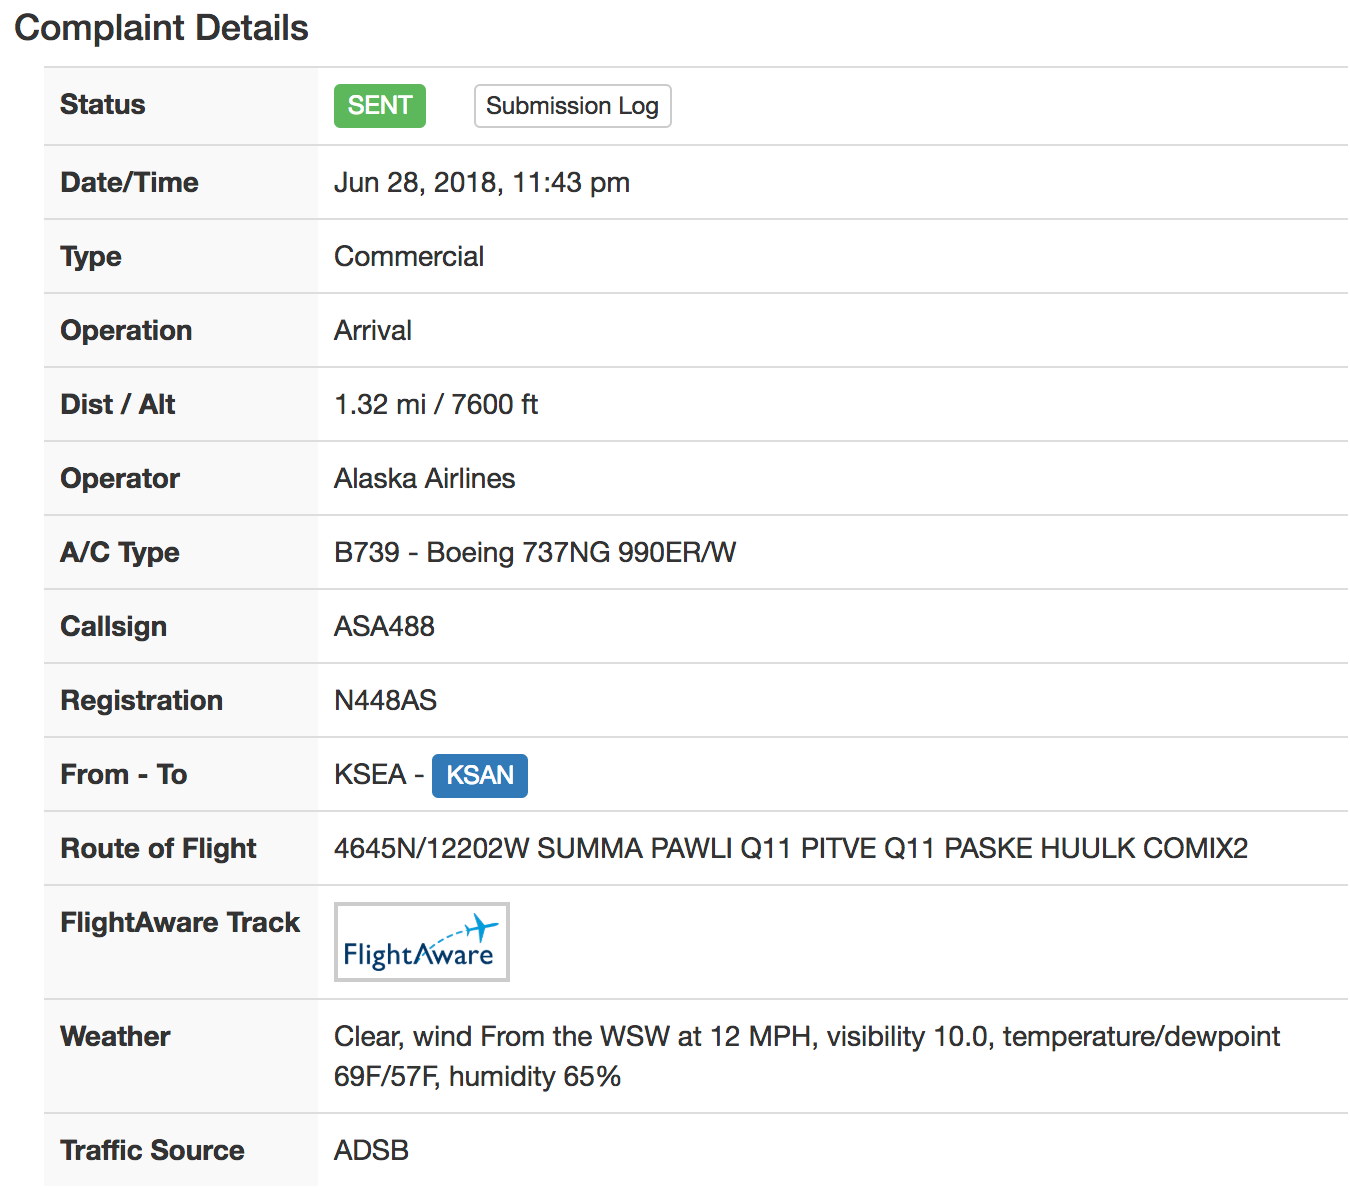
You can see your ten most recent complaints on the Airnoise Dashboard page, or view all of your complaints on the Complaints page.

If you click on the date and time of a complaint you will see more details of the offending aircraft, its flight path, and other data, as shown below.
The Airnoise button needs to be connected to your WiFi in order to work. Instructions were sent via email when your button was shipped to you and printed instructions were mailed with the button.
But hey, we understand that not everyone reads the directions the first or second time, so this third time should be the charm:
- Download the AWS IoT 1-Click app from your favorite app store, either the Apple App Store or from Google Play store.
- The app will guide you through the process to connect the button to your WiFi.
NOTE: Most people (as in 98% — seriously) who have trouble getting their buttons connected to their WiFi don't actually know their own WiFi password. They are sure they do, but they don't. They either wrote it down wrong on that one piece of paper with all the passwords, or their son changed it when he was last home from college but forgot to mention it, or "the cable guy set it up five years ago."
tl;dr; Make sure you know what your WiFi password is.
See these topics for detailed instructions on using the AWS IoT 1-Click app on iOS and Android to setup your button:
- iOS: Using the iOS app
- Android: Using the Android app
NOTE: These instructions are for buttons with a device serial number (DSN) that starts with "G030PM...". If your button DSN starts with "G030MD..." see the "legacy button" instruction topics.
To use an iOS device such as an iPhone or iPad to setup your Airnoise button first download the iOS app here:
AWS 1-Click app on Apple App Store
The following steps guide you through using the AWS app to setup your button and connect it to your home's WiFi network. Use these steps any time you need to reconnect it, such as when your WiFi network name or password change. We suggest you read through all of the steps before you start, and then read each step again as you follow the guide.
HELPFUL TIP: If the button's light stops flashing blue before you've got it connected, don't worry. Just press it again for 6 seconds to turn on the blue light and pick up where you left off.
NOTE: Most people (as in 98% — seriously) who have trouble getting their buttons connected to their WiFi don't actually know their own WiFi password. They are sure they do, but they don't. They either wrote it down wrong on that one piece of paper with all the passwords, or their son changed it when he was last home from college but forgot to mention it, or "the cable guy set it up five years ago."
Step-by-step instructions
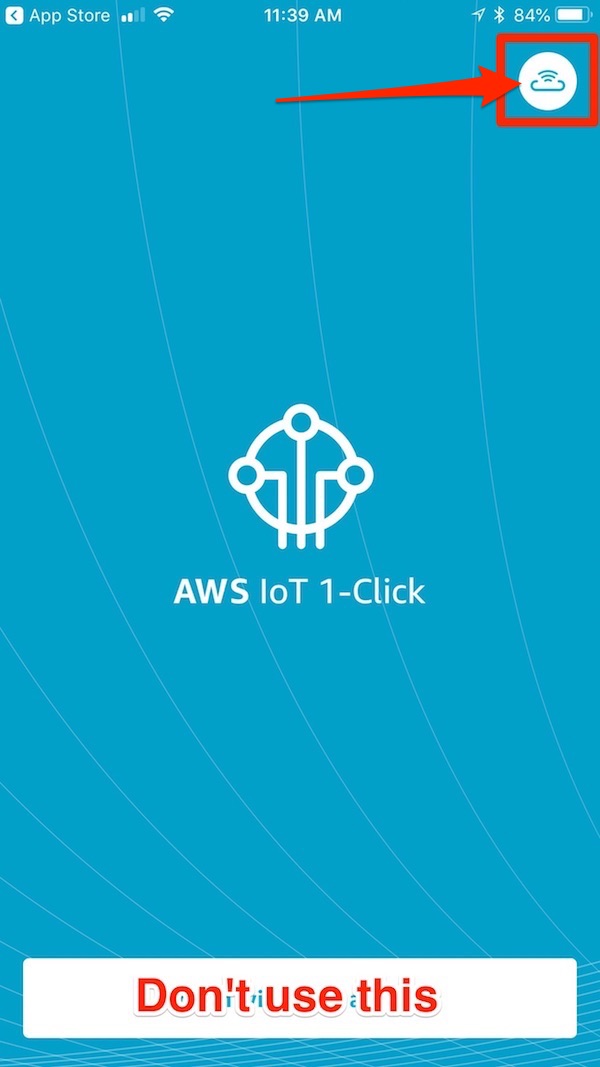
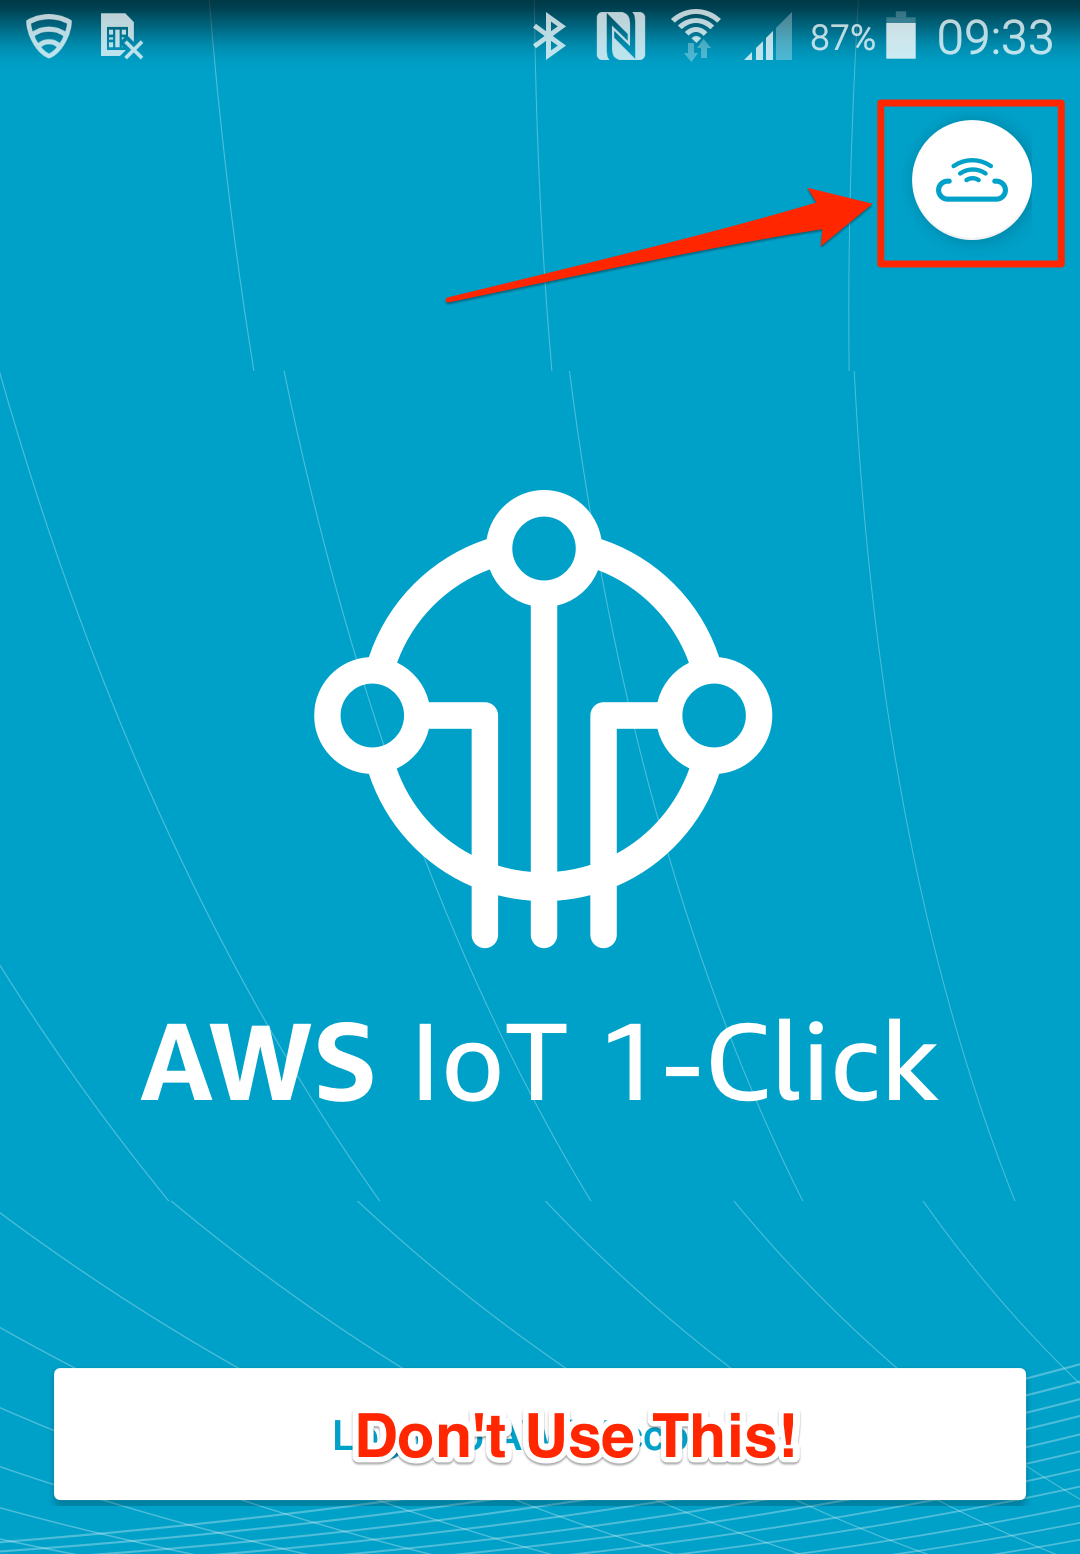
- Start the Amazon app. Click the WiFi setup icon in the top-right corner. NOTE: You do not need to create an AWS account to use this app.
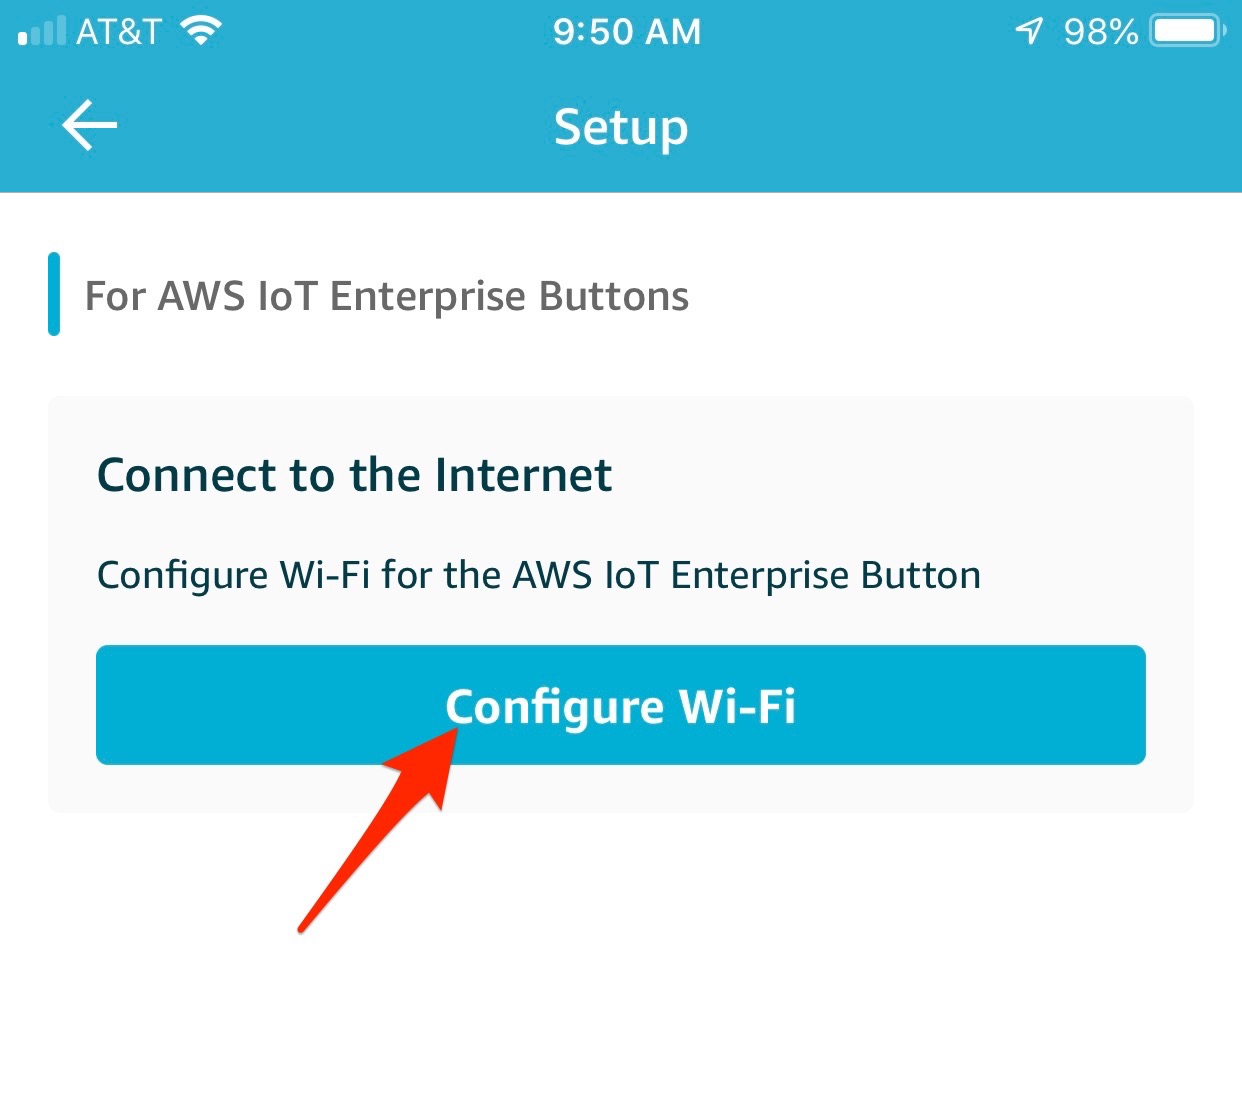
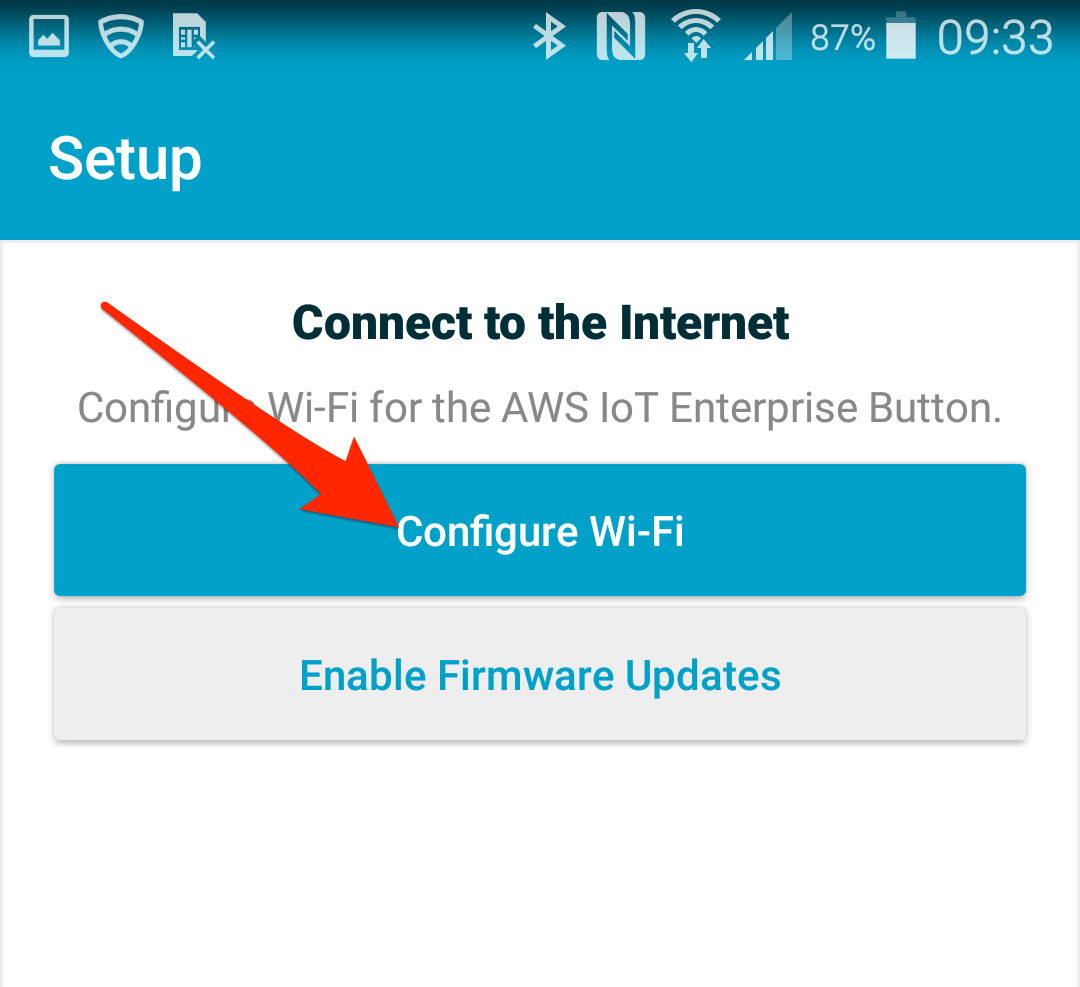
- Tap the blue "Configure Wi-Fi" button on the next screen.
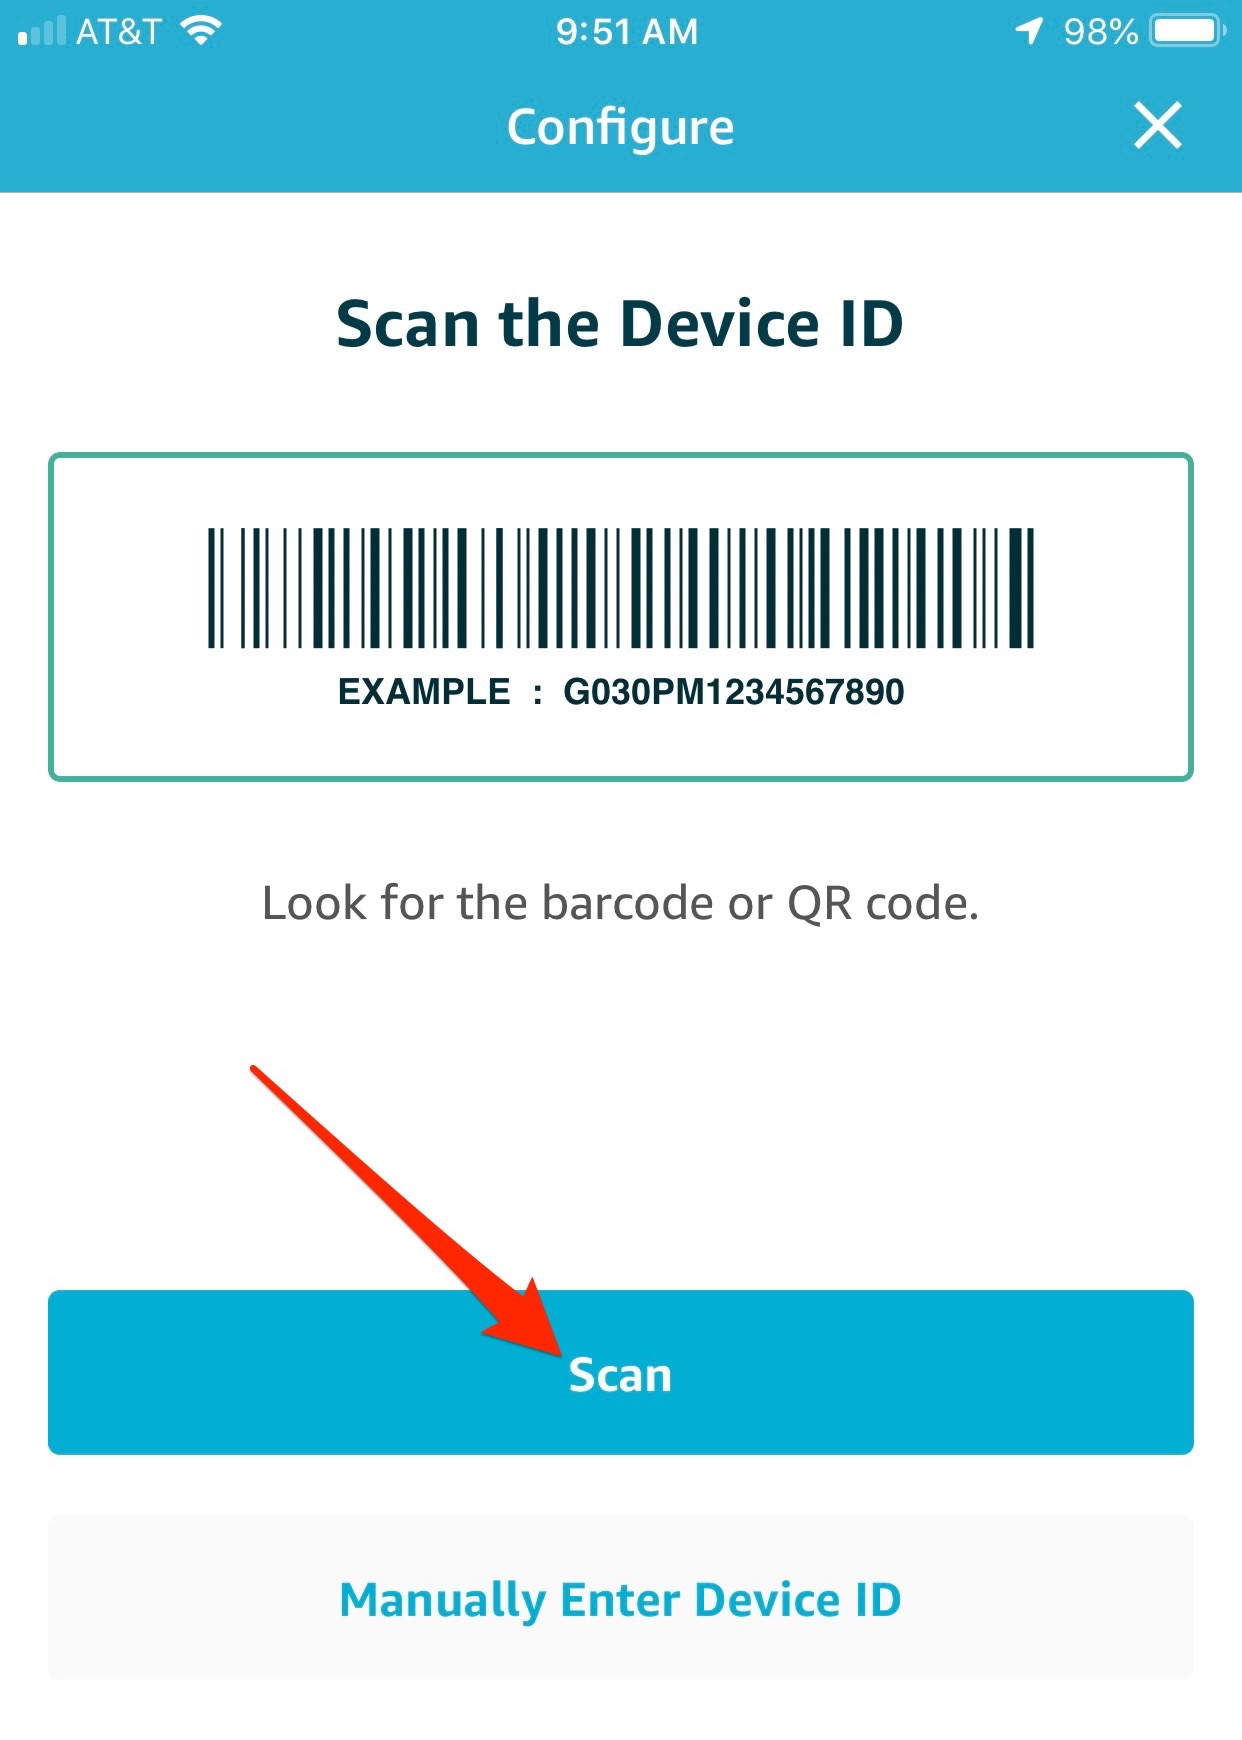
- If you have the box the button came in you can scan the DSN barcode on the end of it - tap "Scan". If you don't have the box you can scan the small QR code on the back of the button or enter the DSN manually, which is also printed on the back of the button. NOTE: If you enter the DSN manually it will contain the number zero but not any capital letter O's.
- Use your device's camera to scan the barcode. A blue line will appear in the viewfinder across the barcode and your device will buzz or beep when it reads the barcode. If you need more light tap the lightning bold icon on the top-right corner. Once you see "1 Device(s) Added" tap the blue "Stop Scanning" button.
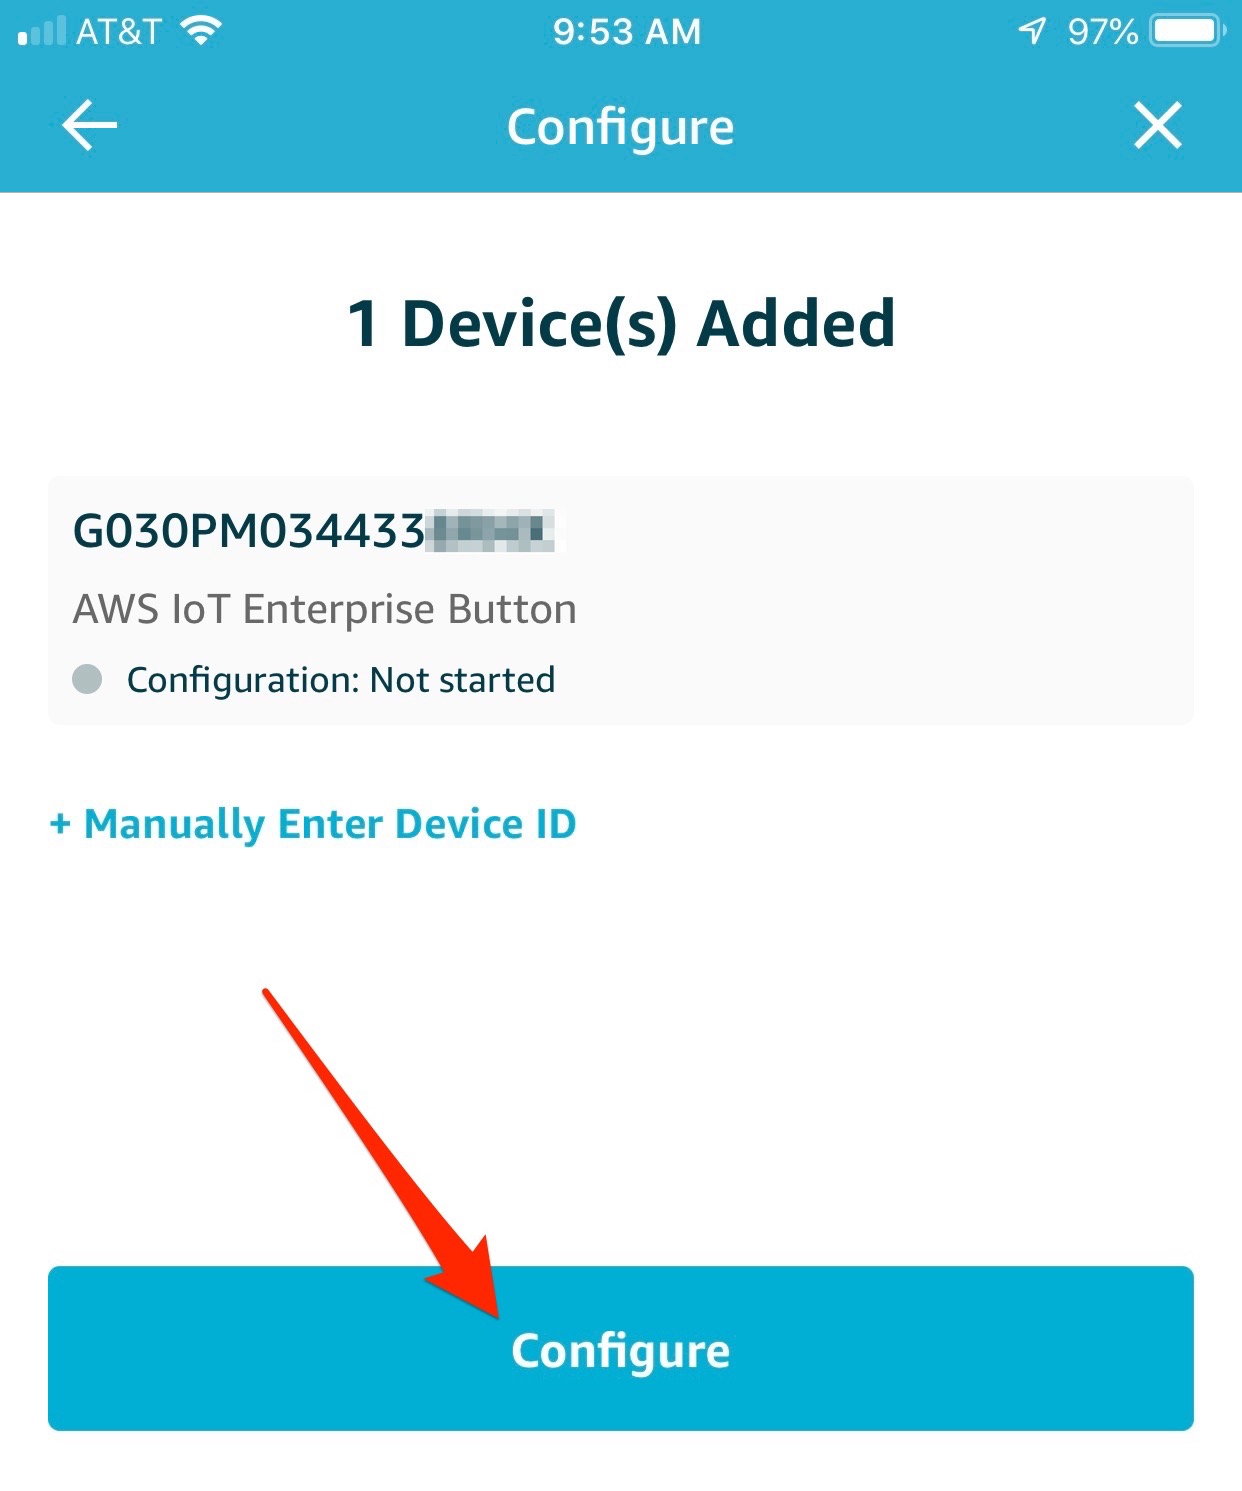
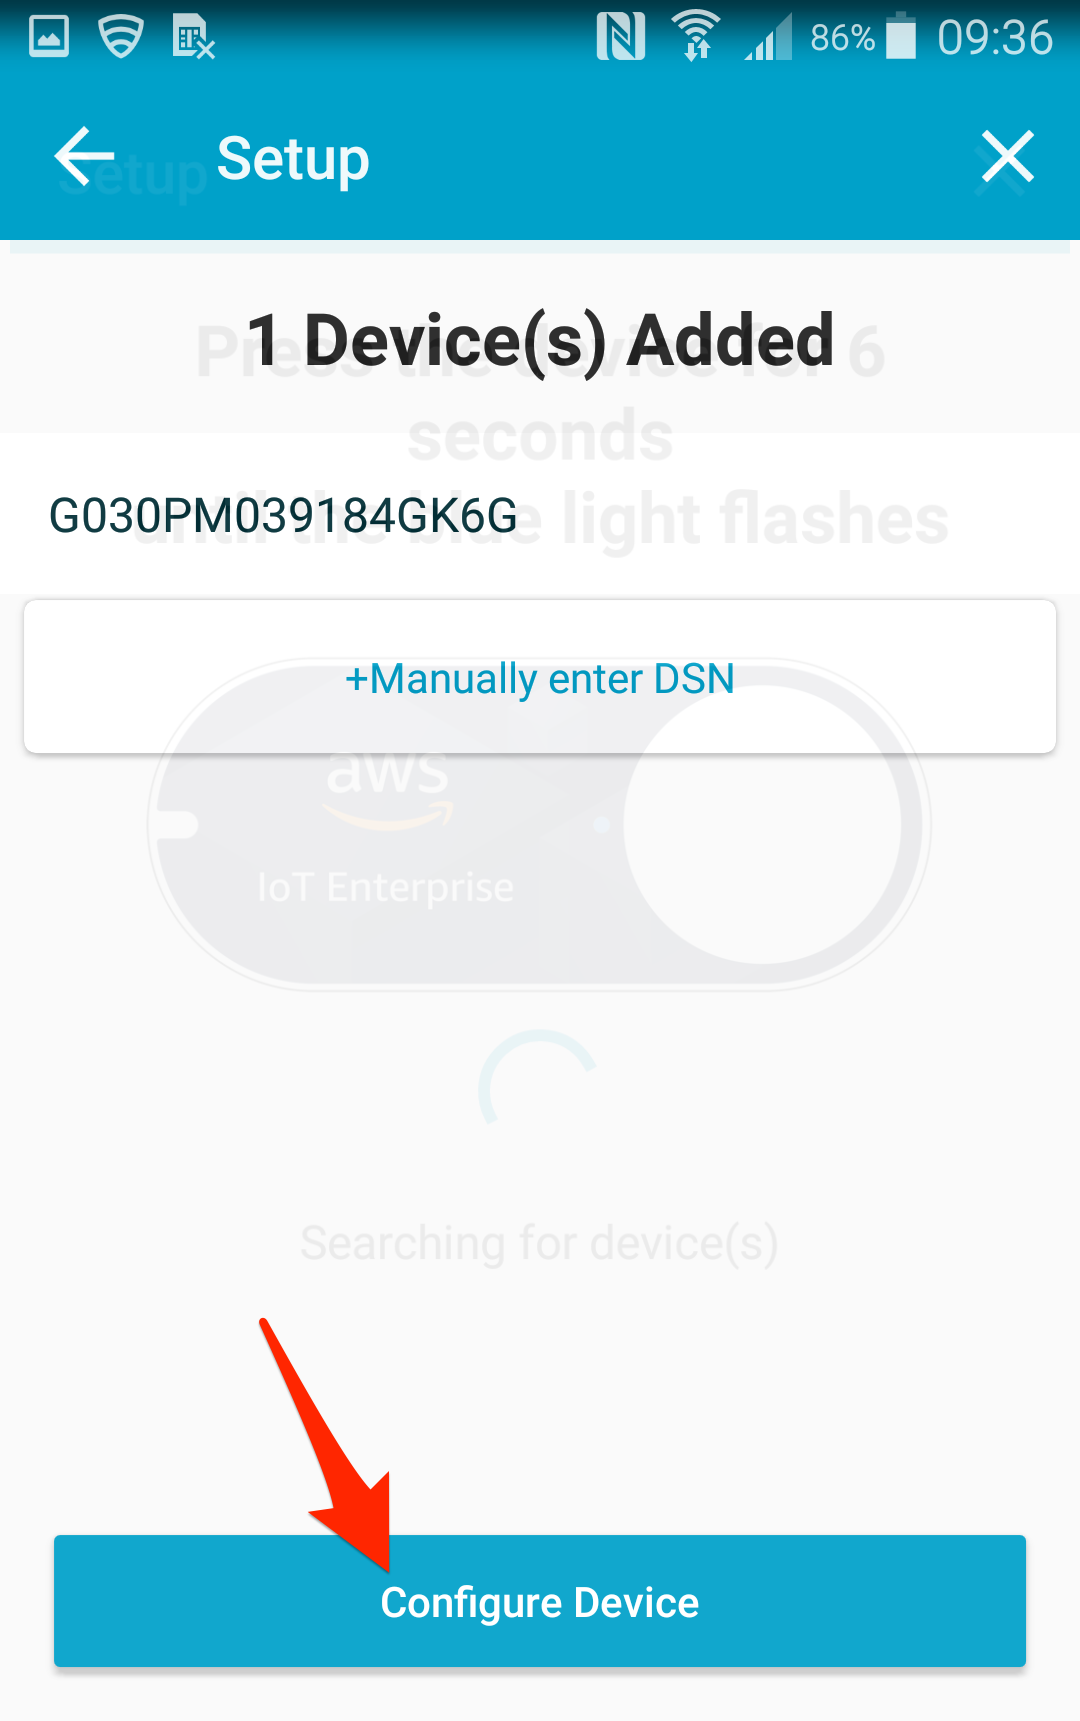
- The next page shows you the DSN of the button that you scanned. Tap the blue "Configure" button to continue.
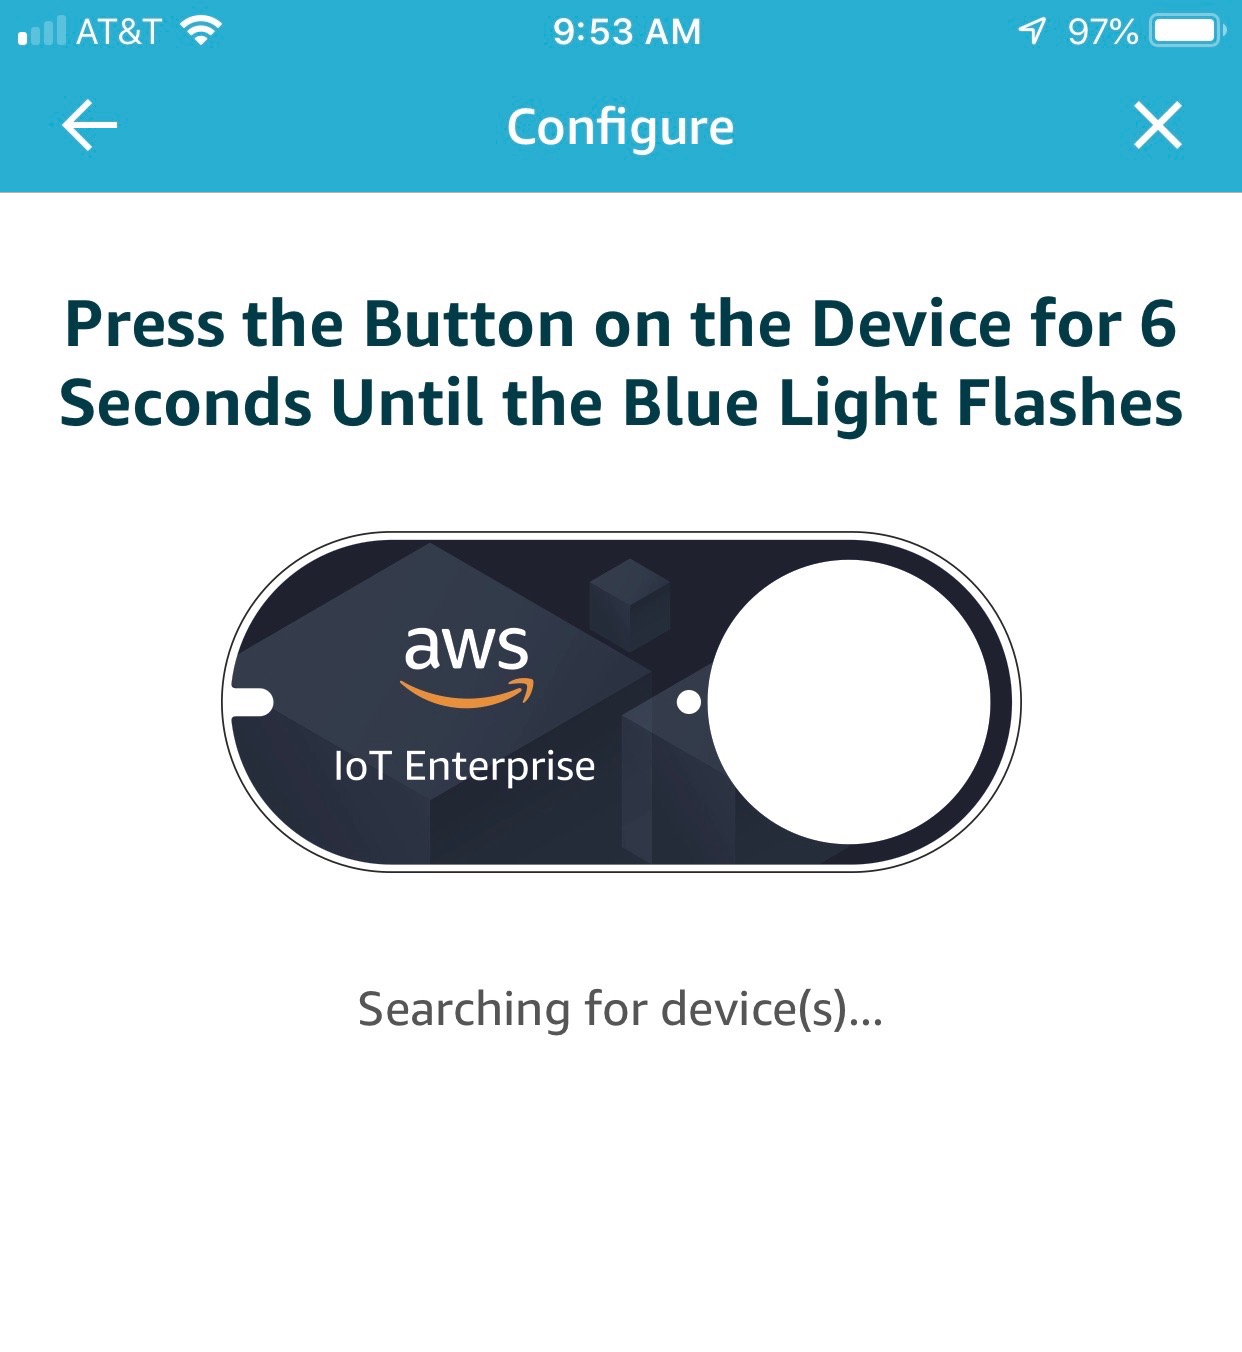
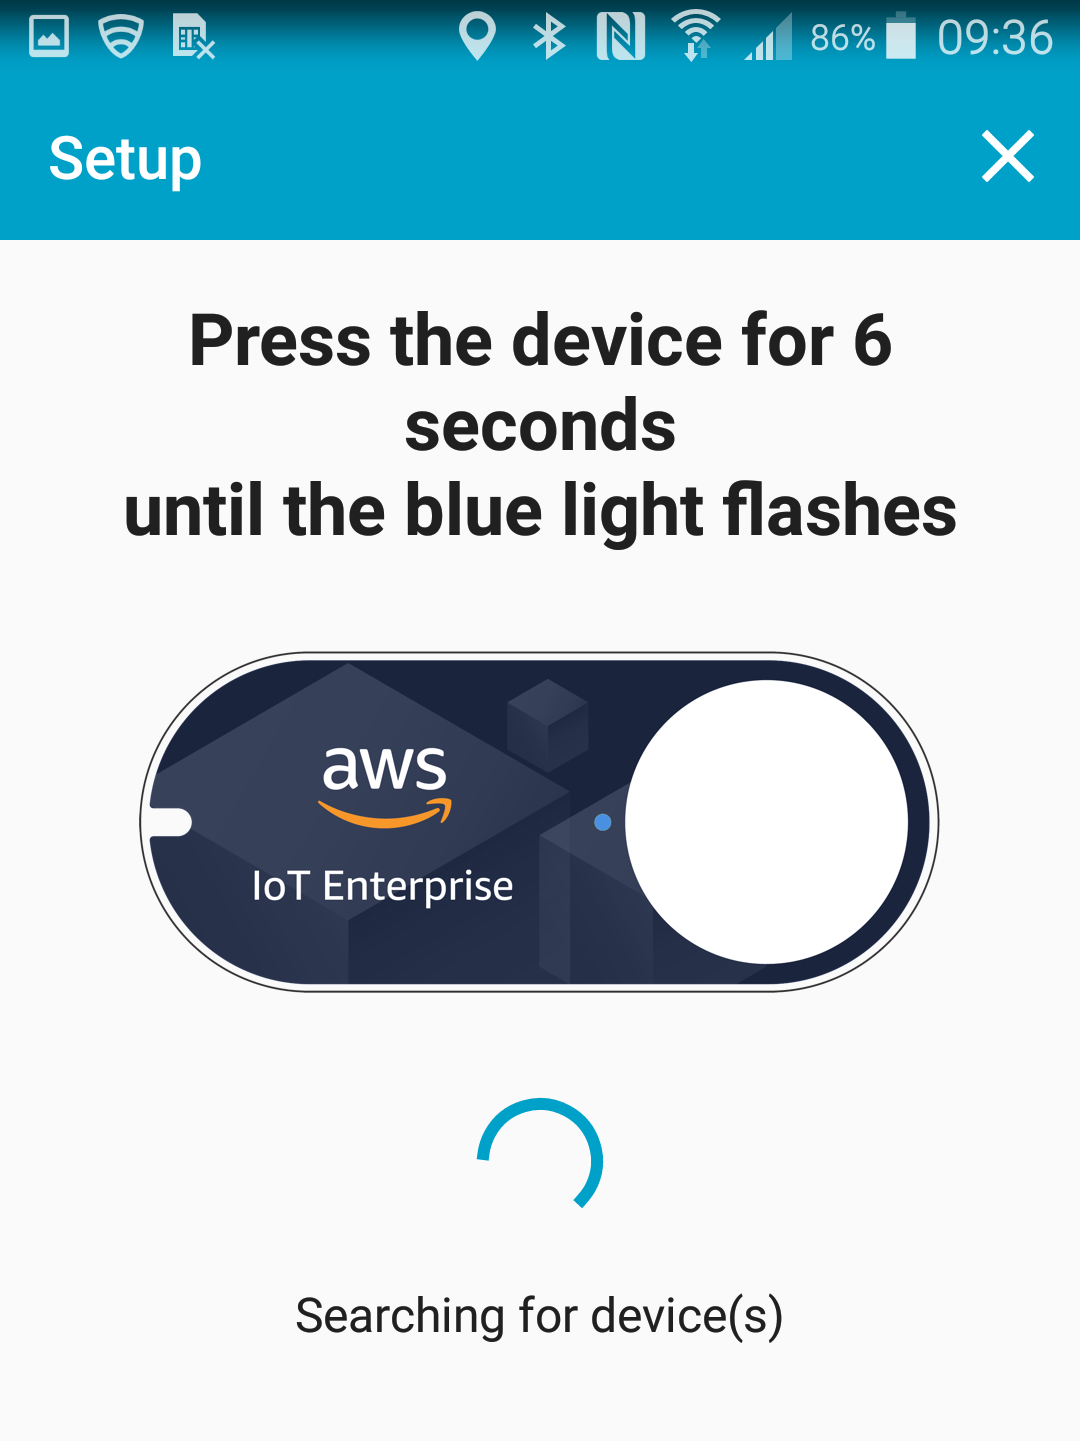
- The next page directs you to press the button for 6 seconds to turn on the blue light. This enables the button's WiFi so the app can connect to it. Once the blue light is flashing the app will automatically connect to the button.
-
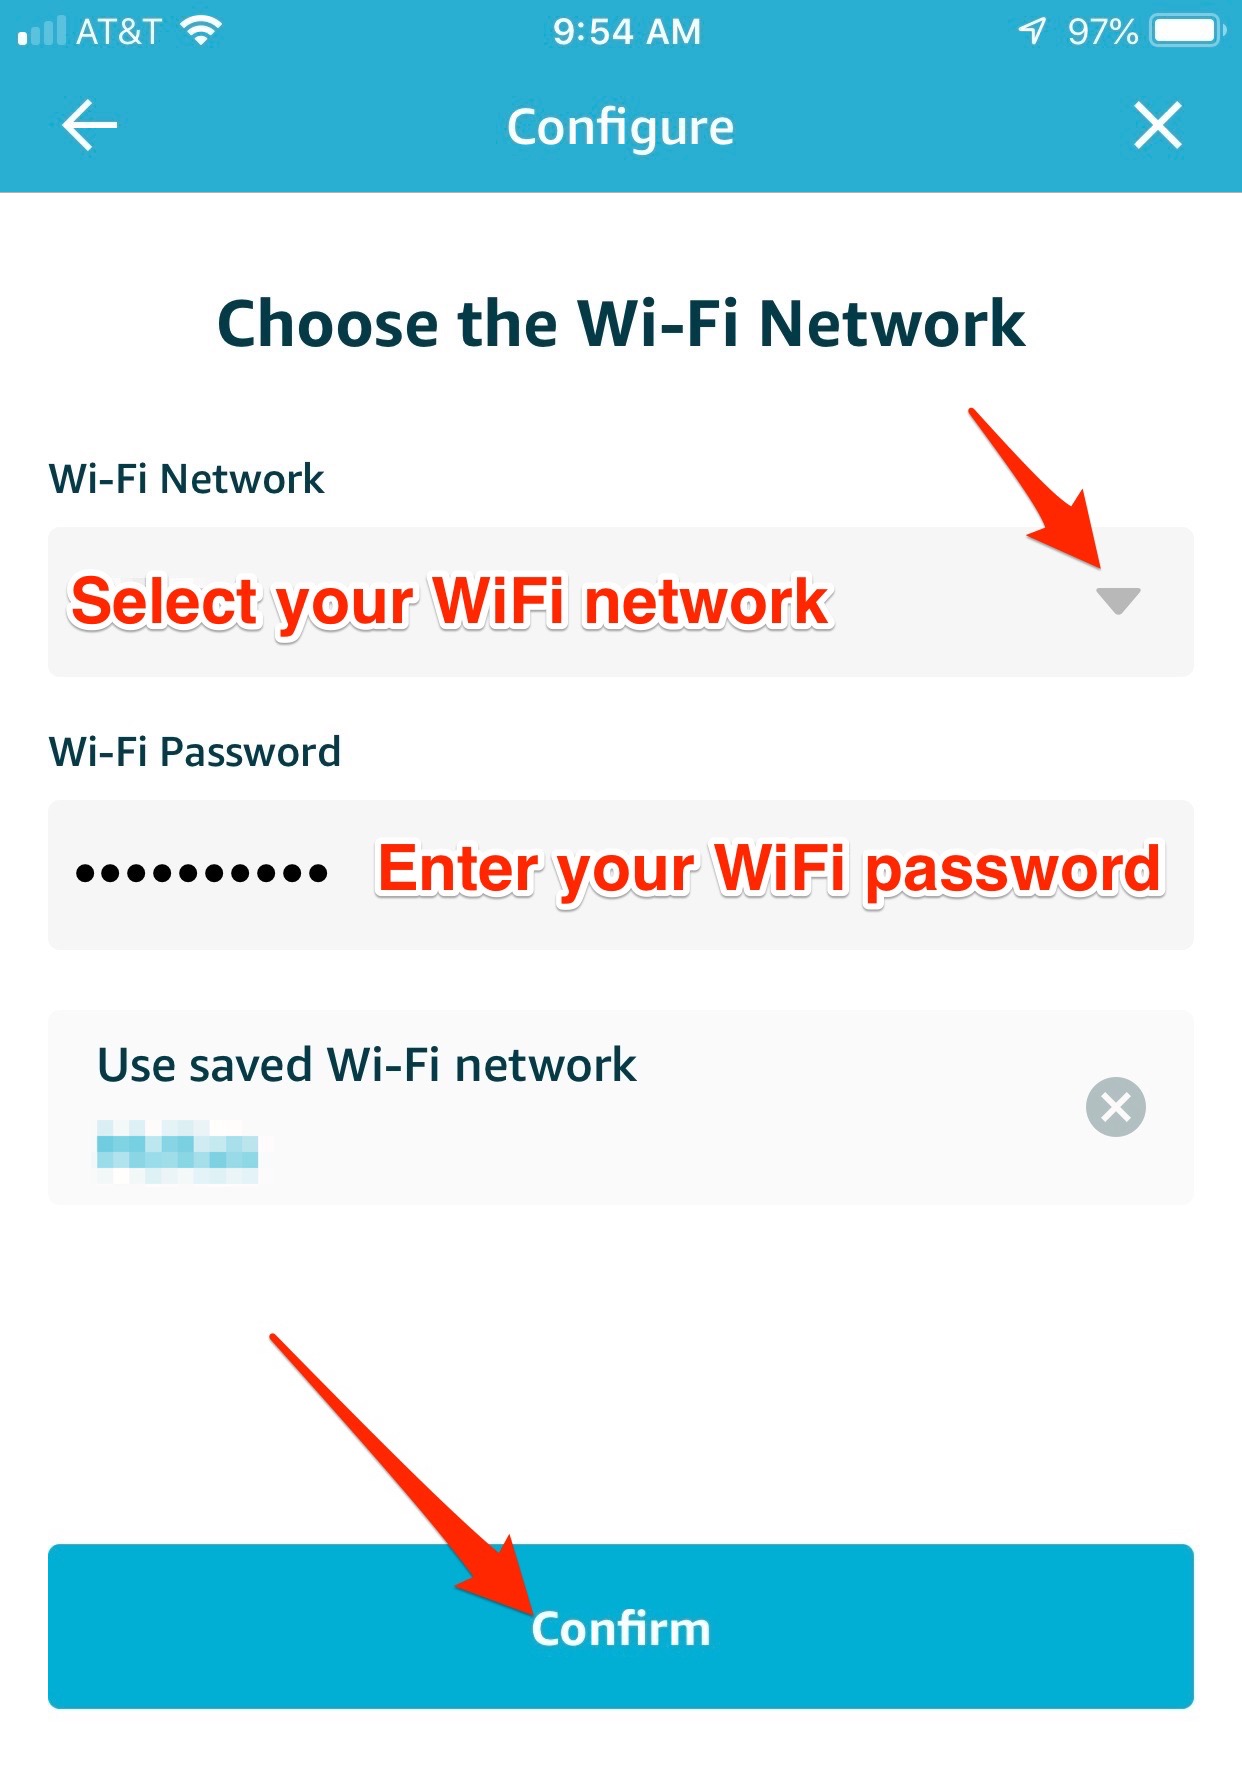
When the app connects to the button it will transition to this page. Here you need
to tap the small triangle in the "Wi-Fi Network" box to see the detected Wi-Fi
networks. Select your home's Wi-Fi network from this list. Enter your Wi-Fi password
in the Wi-Fi Password box and click the blue "Confirm" button.
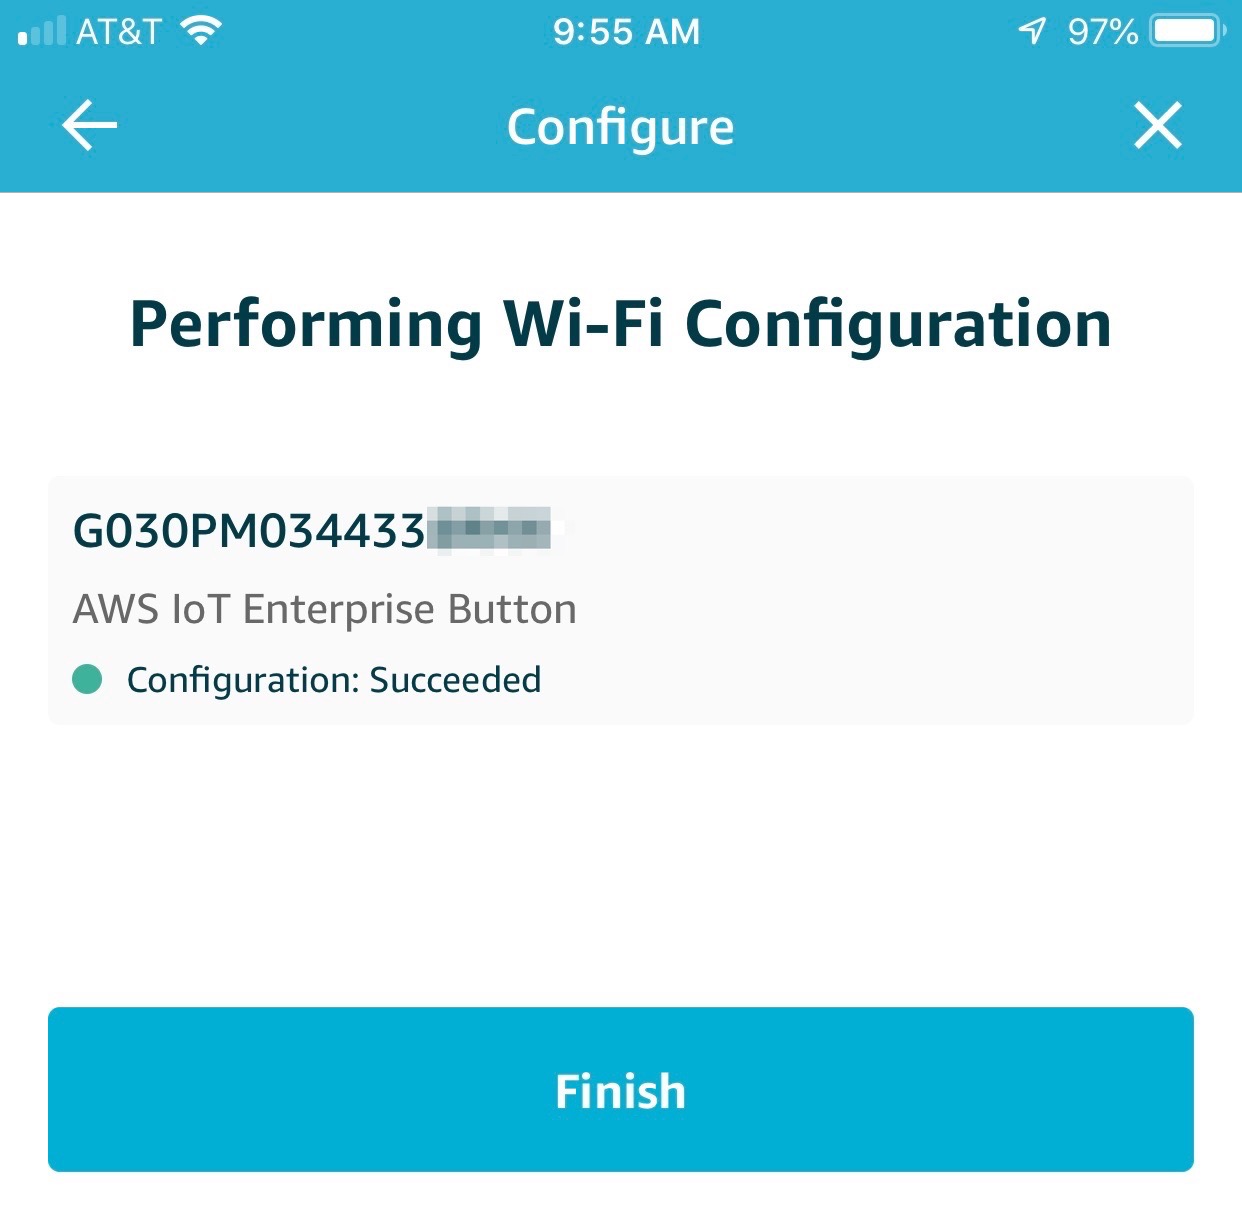
NOTE: Your Wi-Fi network information will be saved so you can easily access it again if you need to reconnect this button or a new one. - The app may take a few seconds to configure the button with your Wi-Fi information. While it does you'll see the screen below with "Configuration: In progress" and once the button is configured, you'll see "Configuration: Succeeded" and the button's light will turn green. You can click the "Finish" button to close this screen.
- To truly test that your button is connected to your WiFi, assuming you saw the green light or even if you're not sure if you did or didn't, click it for about 3 seconds and release it. This will send a signal to Airnoise, and in return the system will immediately send an email to the address you signed-up with letting you know your button is working. You can test your button anytime by doing this. If you receive that email, your button is good to go! Now get clicking!

NOTE: These instructions are for buttons with a device serial number (DSN) that starts with "G030PM...". If your button DSN starts with "G030MD..." see the "legacy button" instruction topics.
To use an android device such as an iPhone or iPad to setup your Airnoise button first download the android app here:
AWS 1-Click app on Google Play store
The following steps guide you through using the AWS app to setup your button and connect it to your home's WiFi network. Use these steps any time you need to reconnect it, such as when your WiFi network name or password change. We suggest you read through all of the steps before you start, and then read each step again as you follow the guide.
HELPFUL TIP: If the button's light stops flashing blue before you've got it connected, don't worry. Just press it again for 6 seconds to turn on the blue light and pick up where you left off.
NOTE: Most people (as in 98% — seriously) who have trouble getting their buttons connected to their WiFi don't actually know their own WiFi password. They are sure they do, but they don't. They either wrote it down wrong on that one piece of paper with all the passwords, or their son changed it when he was last home from college but forgot to mention it, or "the cable guy set it up five years ago."
Step-by-step instructions
- Start the Amazon app. Click the WiFi setup icon in the top-right corner. NOTE: You DO NOT need to create an AWS account to use this app or enter a credit card number.
- Tap the blue "Configure Wi-Fi" button on the next screen.
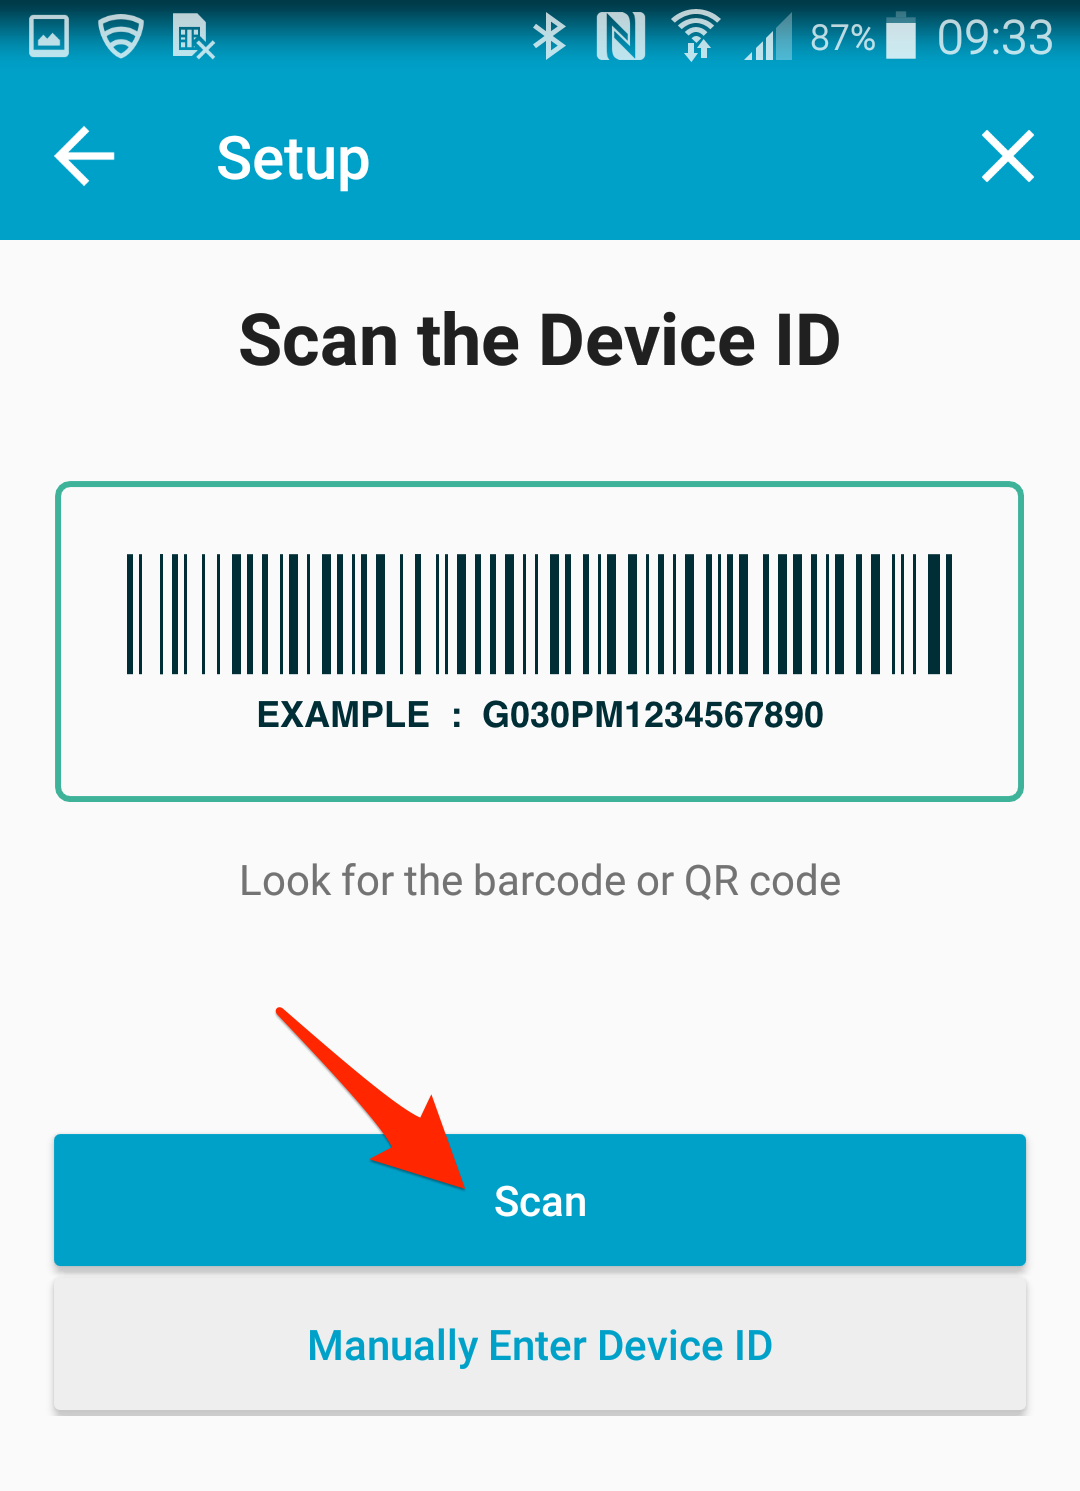
- If you have the box the button came in you can scan the DSN barcode on the end of it - tap "Scan". If you don't have the box you can scan the small QR code on the back of the button or enter the DSN manually, which is also printed on the back of the button. NOTE: If you enter the DSN manually it will contain the number zero but not any capital letter O's. Your device may ask for permission to turn on Bluetooth, use the camera and your current location - please allow these to continue.
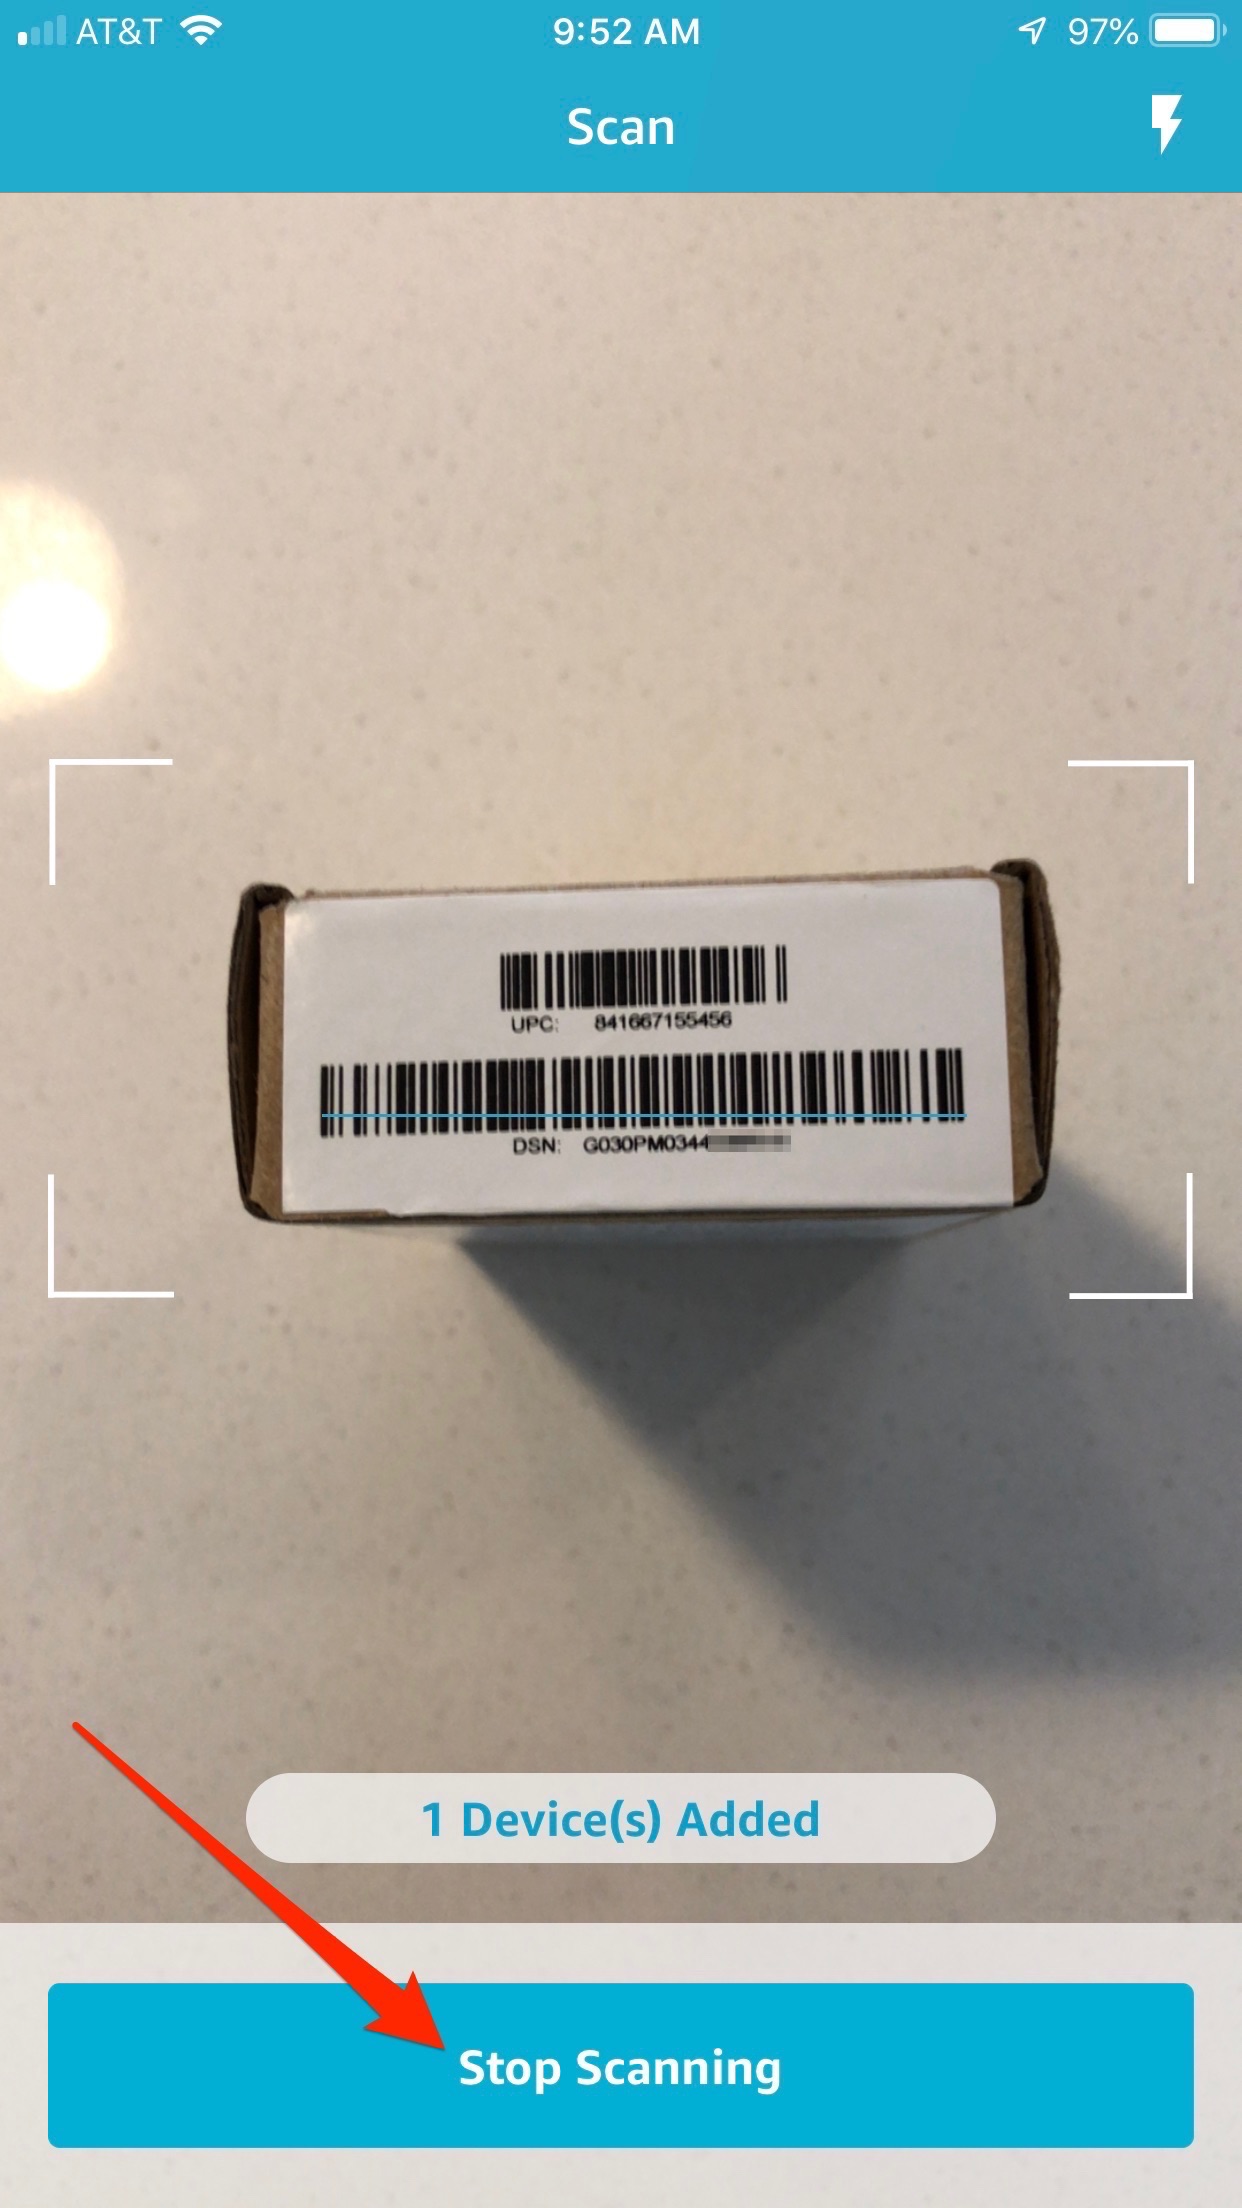
- Use your device's camera to scan the barcode. You may have to tap the image to get the camera to focus on the barcode properly. A green overly of the DSN will appear in the viewfinder across the barcode and your device will buzz or beep when it reads the barcode. If you need more light tap the lightning bold icon on the top-right corner. Once you see "1 Device(s) Added" tap the blue "Stop Scanning" button.
- The next page shows you the DSN of the button that you scanned. Tap the blue "Configure Device" button to continue.
- The next page directs you to press the button for 6 seconds to turn on the blue light. This enables the button's WiFi so the app can connect to it. Once the blue light is flashing the app will automatically connect to the button.
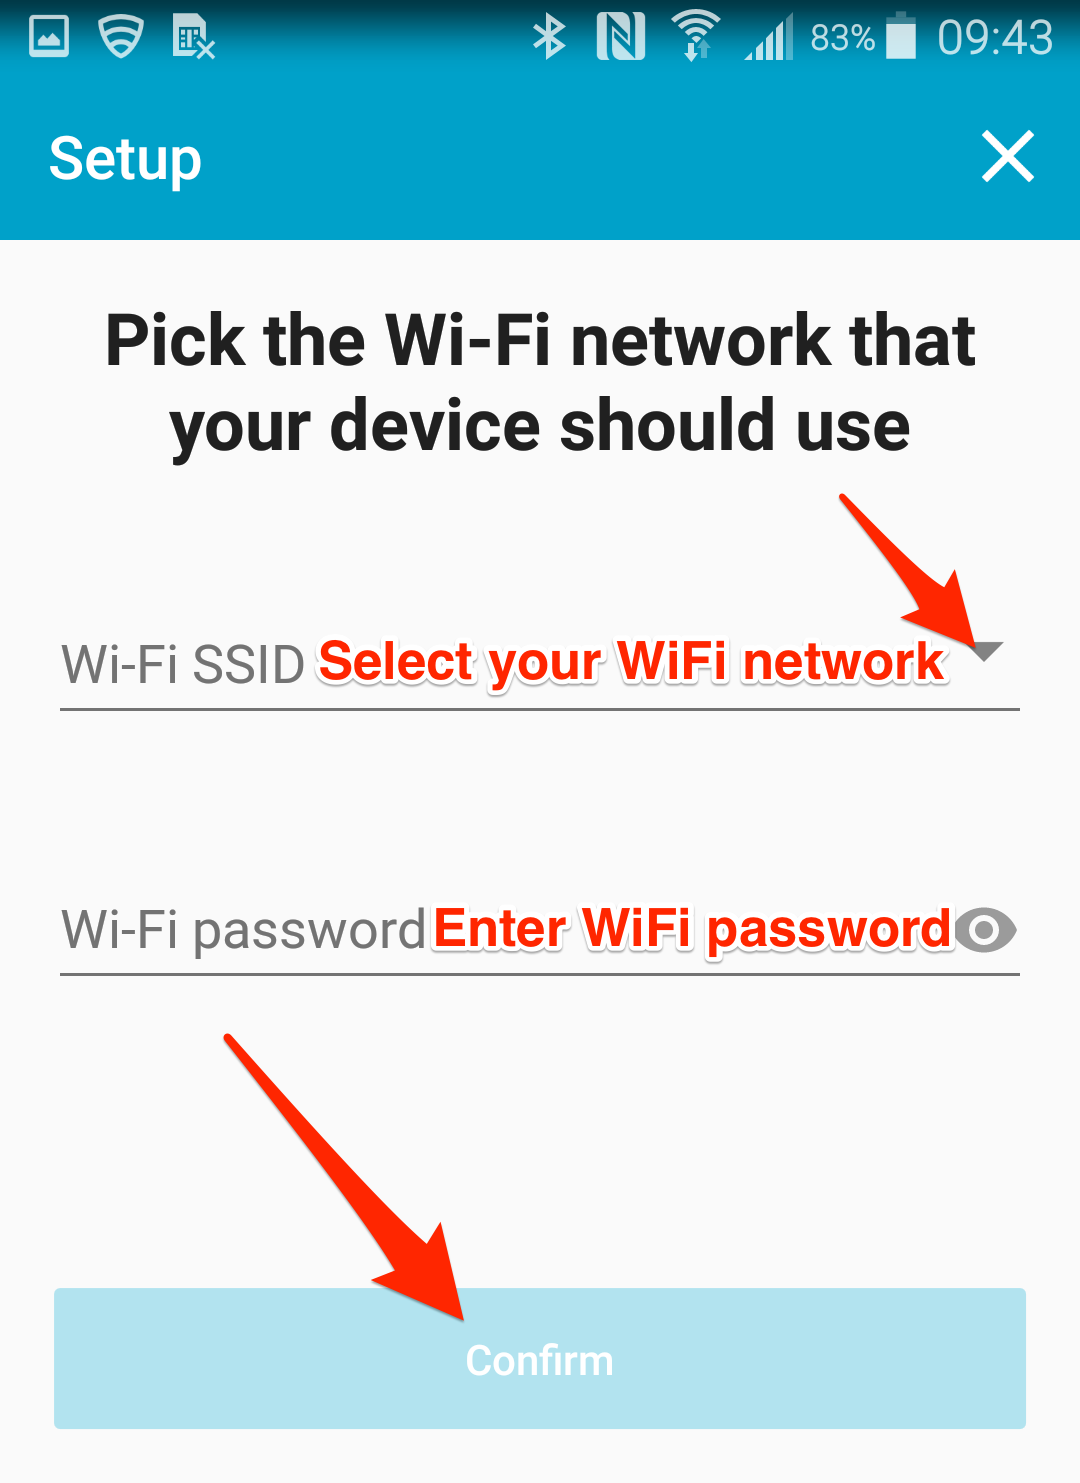
- When the app connects to the button it will transition to the next page. Here you need to tap the small triangle in the "Wi-Fi SSID" box to see the detected Wi-Fi networks. Select your home's Wi-Fi network from this list. Enter your Wi-Fi password in the "Wi-Fi Password" box and click the blue "Confirm" button.
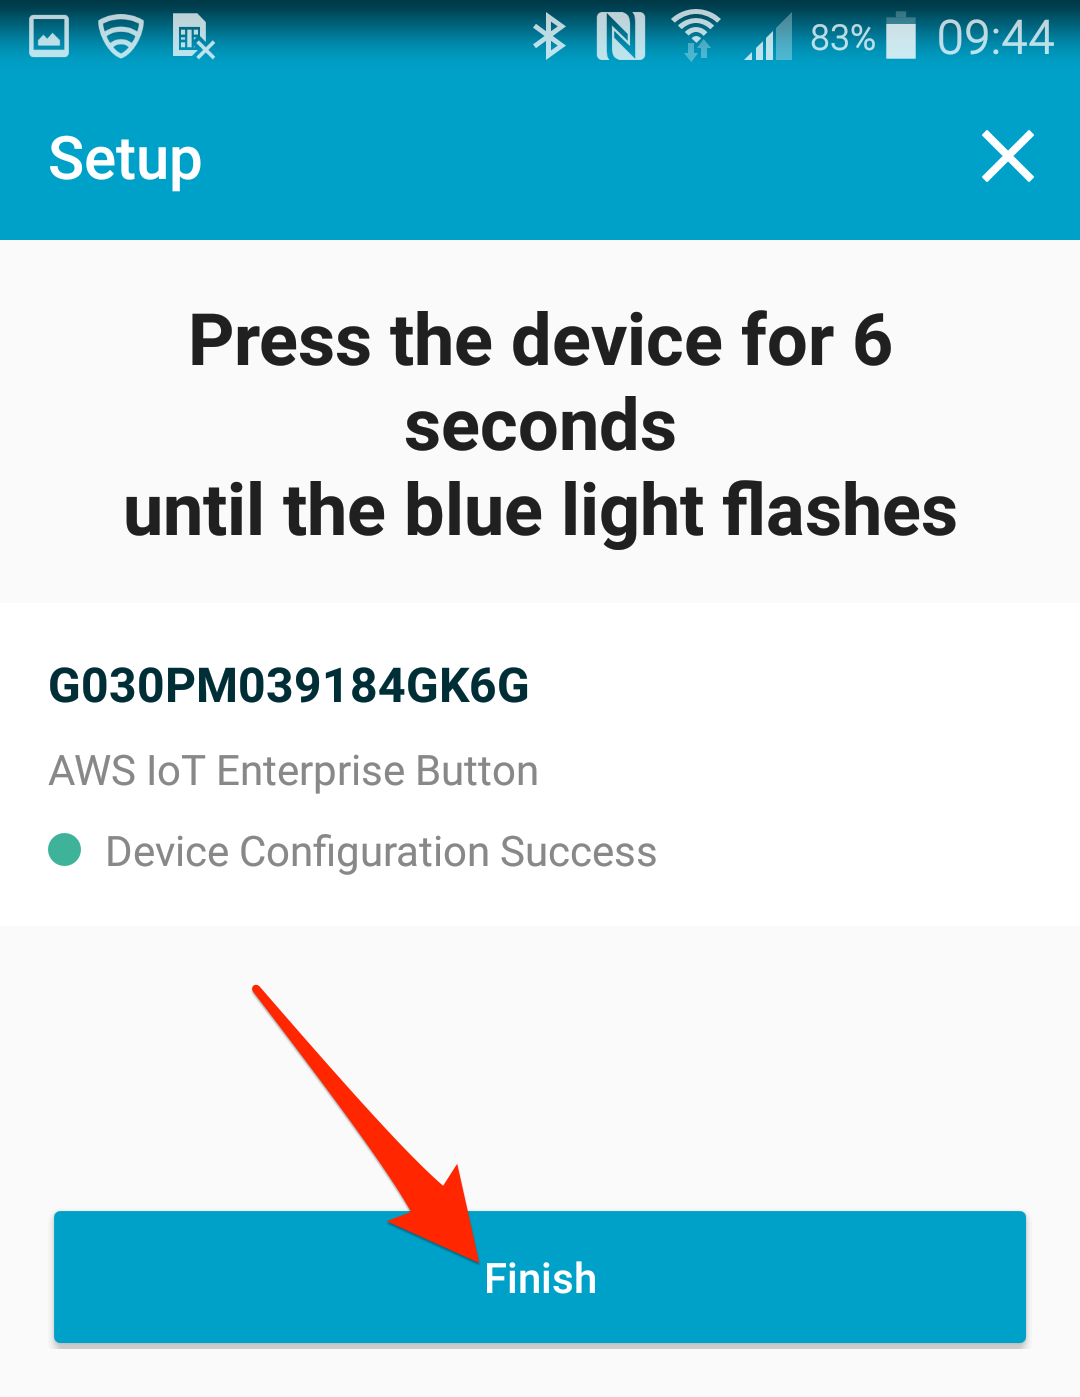
- The app may take a few seconds to configure the button with your Wi-Fi information. While it does you'll see the screen below with "Device Configuration In progress" and once the button is configured, you'll see "Device Configuration Success" and the button's light will turn green. You can click the "Finish" button to close this screen. The app may ask you if it's okay to close the app -- do this.
- To truly test that your button is connected to your WiFi, assuming you saw the green light or even if you're not sure if you did or didn't, click it for about 3 seconds and release it. This will send a test signal to Airnoise (it won't generate a complaint), and in return the system will immediately send an email to the address you signed-up with letting you know your button is working. You can test your button anytime by doing this. If you receive that email, your button is good to go! Now get clicking!
To use an iOS device such as an iPhone or iPad to setup your Airnoise button first download the iOS app here:
AWS IoT Button Wi-Fi app on Apple App Store
The following steps guide you through using the AWS app to setup your button and connect it to your home's WiFi network. Use these steps any time you need to reconnect it, such as when your WiFi network name or password change. We suggest you read through all of the steps before you start, and then read each step again as you follow the guide.
HELPFUL TIP: If the button's light stops flashing blue before you've got it connected, don't worry. Just press it again for 6 seconds to turn on the blue light and pick up where you left off. Remember not to press the button continuously for 15 seconds as that will reset it and wipe the security credentials that our crew of minions painstakingly crafted bit-by-bit. If you somehow do that, we can help you fix it, but try not to do that, okay?
NOTE: Most people (as in 98% — seriously) who have trouble getting their buttons connected to their WiFi don't actually know their own WiFi password. They are sure they do, but they don't. They either wrote it down wrong on that one piece of paper with all the passwords, or their son changed it when he was last home from college but forgot to mention it, or "the cable guy set it up five years ago."
Step-by-step instructions
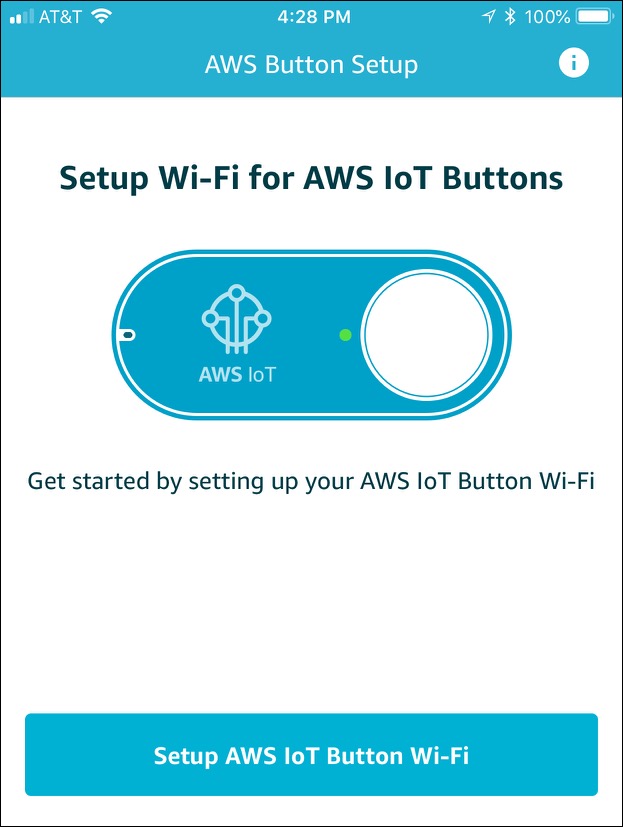
- Start the Amazon app. Click the blue "Setup" button at the bottom.
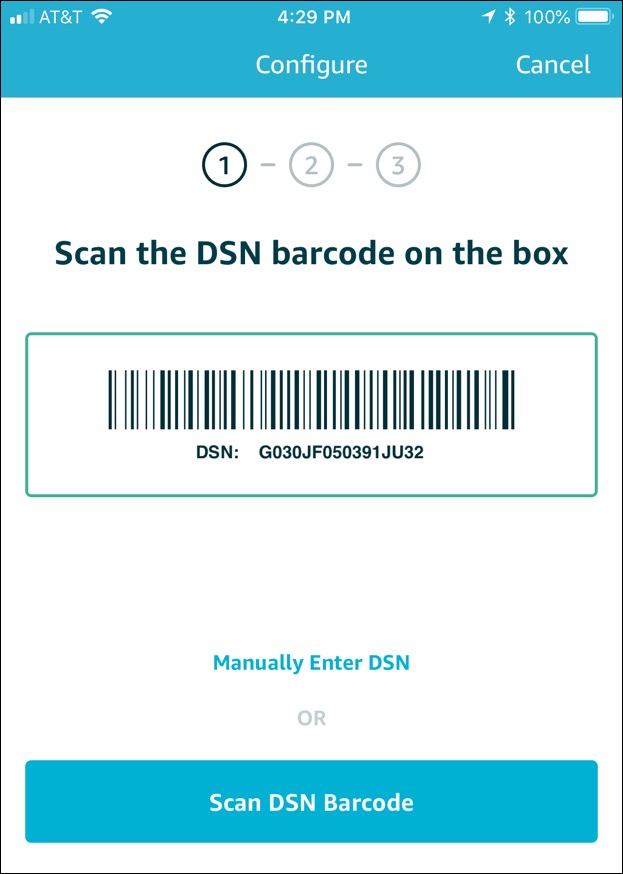
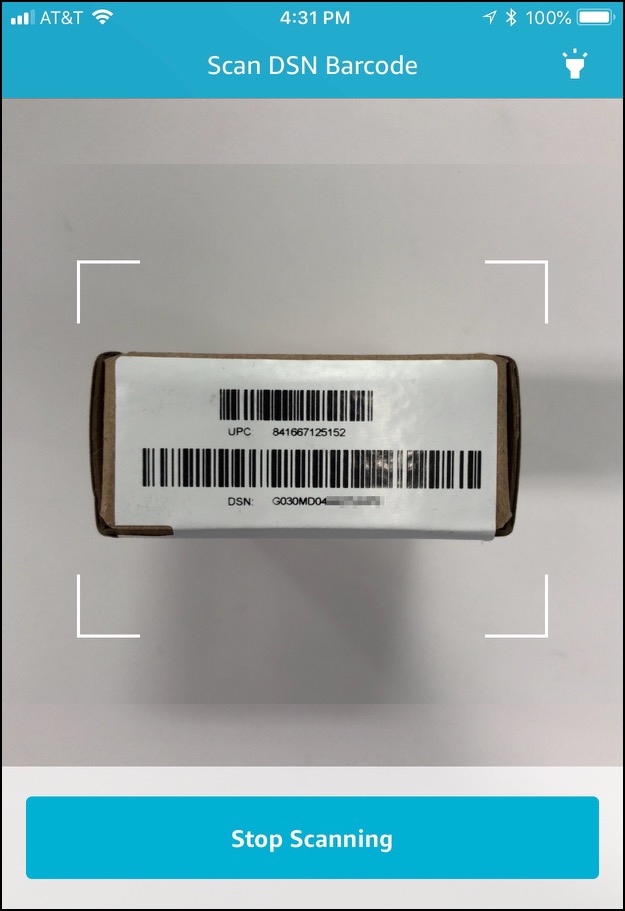
- If you have the box the button came in you can scan the DSN barcode on the end of it - tap "Scan DSN Barcode." If you don't you can just manually enter the DSN that's printed on the back of the button by tapping "Manually Enter DSN." The DSN contains zeroes, not uppercase O's.
- Use your device's camera to scan the barcode. A blue line will appear in the viewfinder across the barcode and your device will buzz or beep when it reads the barcode. If you need more light tap the flashlight icon on the top-right corner. Sometimes the quality of the barcode printing is poor, so if the app won't read the barcode, tap "Stop Scanning" and manually enter the DSN.
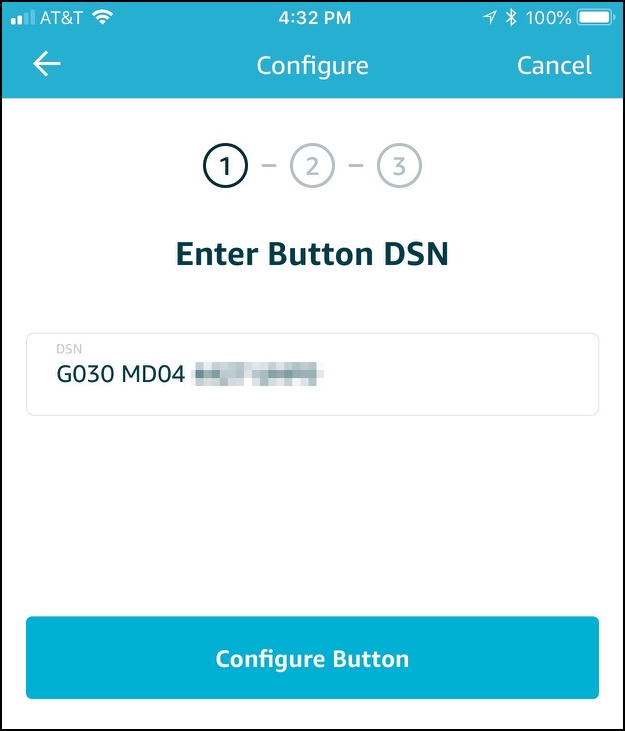
- When the barcode is scanned or you enter the DSN manually you'll see the page below. Tap "Configure Button" to move to the next step.
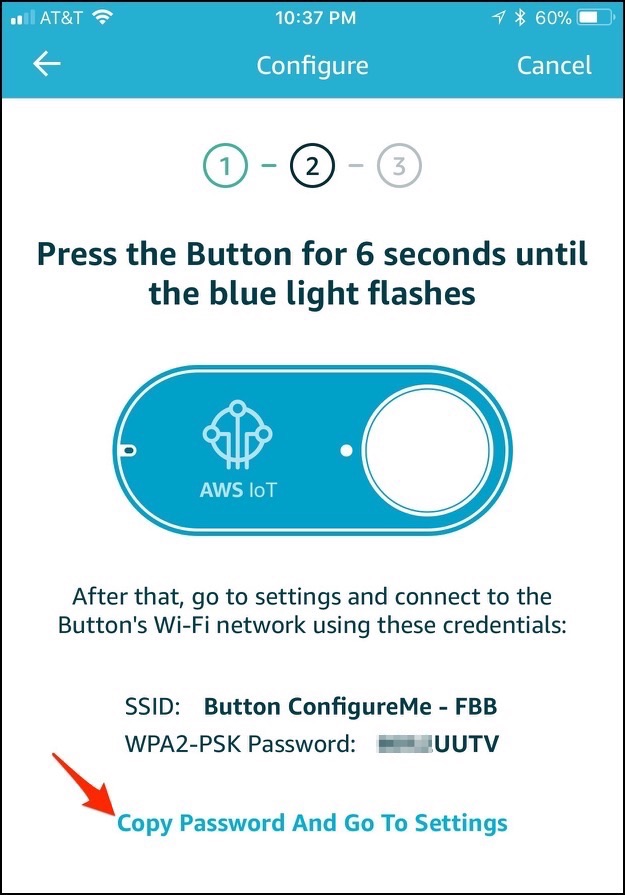
- The next page directs you to press the button for 6 seconds to turn on the blue light. This enables the button's WiFi so you can connect your device to it. Once the blue light is flashing tap the "Copy Password And Go To Settings" link at the bottom. This will copy the button's password into the clipboard so you can paste it into the password box and take you to your device's WiFi settings. Note that the button's "WPA2-PSK Password" is shown - it's just the last 8 digits of the button's DSN without a space.
-
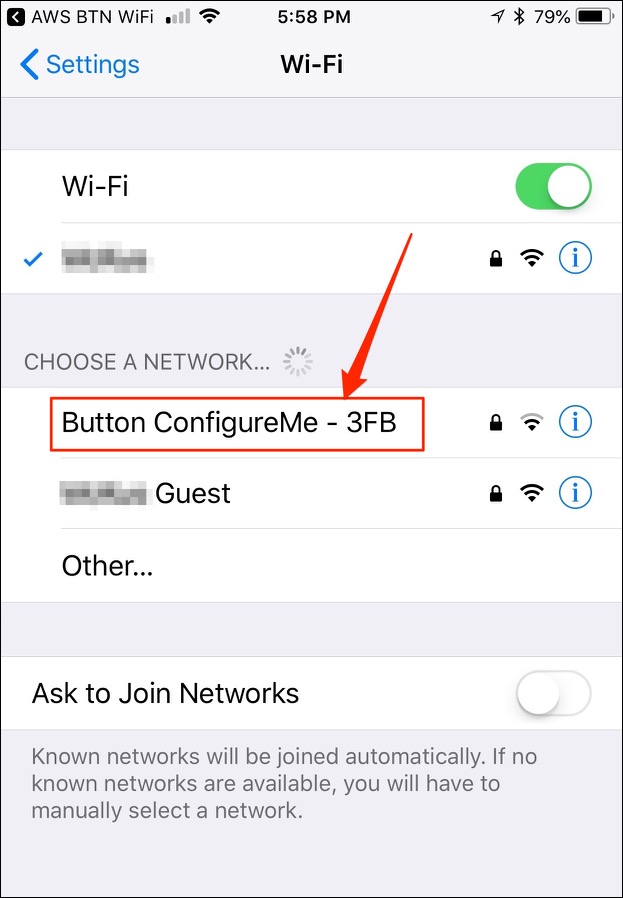
On the WiFi page you should see the "Button ConfigureMe - nnn" network listed
under "CHOOSE A NETWORK". If you don't see it immediately wait 10-15 seconds
until your device scans for networks again and it should appear. Once it does,
tap on the "Button ConfigureMe - nnn" label (not on the blue 'i' in the circle).
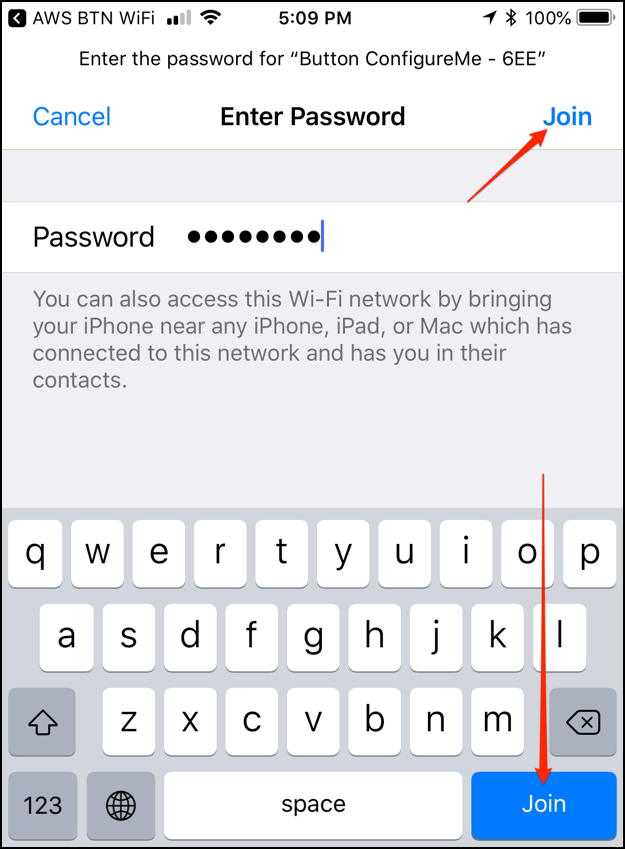
NOTE: The first time you do this on a device you'll be asked for the button's password. Every time thereafter your device WILL NOT ask for the button's password unless you "forget" the button's WiFi network. Your device will just connect to the button's network when you tap on its name in the "Choose a network" list. - The button's password should be stored in the clipboard so you can just paste it into the Password box, or you can type in the last 8 digits of the DSN. Once you enter the password, tap the "Join" link or the "Join" button.
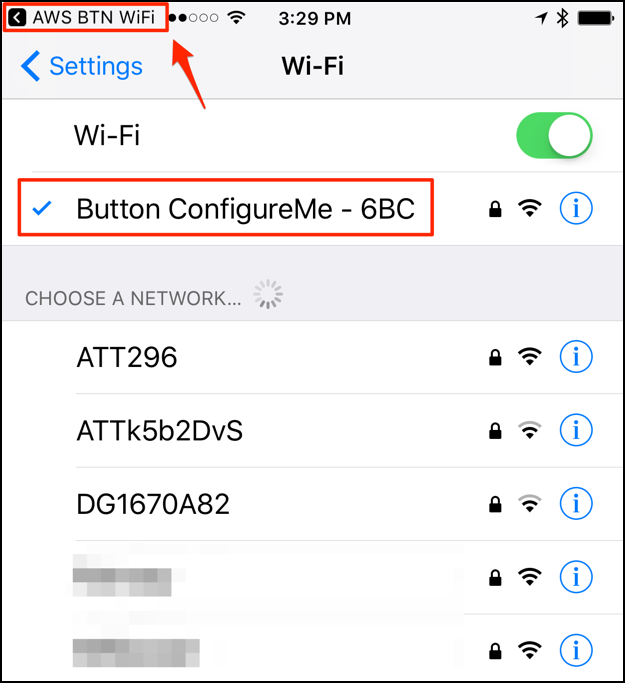
-
Once you've entered the button's password and tapped "Join" you should see the
"Button ConfigureMe - nnn" network at the top of the WiFi page with a blue
checkmark next to it, as highlighted by the red box below.
This means you've successfully connected to the button.
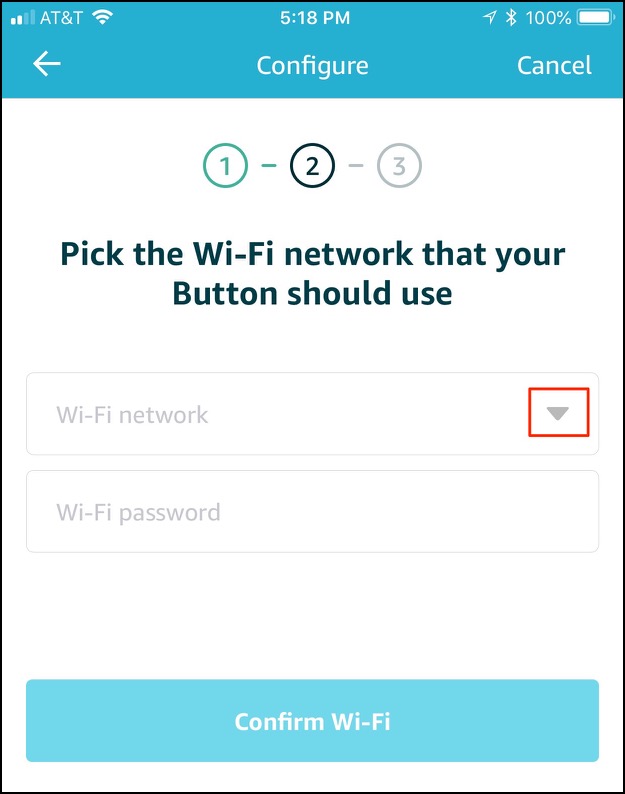
If the blue light stops flashing during this process just re-enable it by pressing the button for 6 seconds and pick up where you left off. From here tap the "AWS BTN WiFi" link in the top-left corner or re-select the AWS app to continue. Also, when the button turns off its WiFi network your device will reconnect to your home's WiFi, so don't fret that you will be forever disconnected. - On the next page you will select the WiFi network you want the button to be connected to. Tap the little down-pointing triangle in the "Wi-Fi network" box to see a list of available WiFi networks and select the one you want.
-
Next, enter your WiFi network's password into the "Wi-Fi password"
box, not the button's password. You do know your WiFi password, right? See the
note above about "knowing" your WiFi password — this is the most common
reason people have difficulty connecting their buttons. But you know your WiFi
password, don't you?
Once you enter your password tap "Confirm Wi-Fi" and keep an eye on the button — you want to see the light on it turn green. If it doesn't turn green, it's not connected! Re-read that line a few times — what color will it turn if all is well? Green. Not red, not orange, and purple is right out. Green. It needs to turn green. -
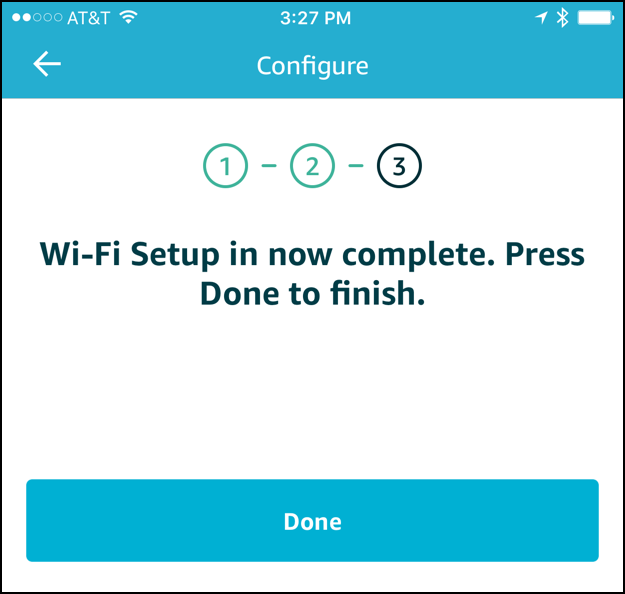
Once you get all the way through the Amazon app's steps you'll see the screen
below. Newsflash! You'll see this page regardless of whether or
not your button is actually connected to your WiFi network as long as
you pressed the "Confirm Wi-Fi" button in the previous step.
Yeah, you'd think that all the smart people at Amazon would come up with something better, but they have to pay for that free Prime shipping somehow. See below for a better way to be sure the button is setup properly. Feel free to tap the "Done" button since it's staring you in the face — it doesn't really do anything, either. - To truly test that your button is connected to your WiFi, assuming you saw the green light or even if you're not sure if you did or didn't, click it for about 2 seconds and release it. This will send a signal to Airnoise, and in return the system will immediately send an email to the address you signed-up with letting you know your button is working. You can test your button anytime by doing this. If you receive that email, your button is good to go! Now get clicking!

To use an Android phone or tablet to setup your Airnoise button first download the Android app from the Google Play store here:
AWS IoT Button Wi-Fi app on Google Play
Detailed steps with screenshots coming soon!